One of the blogs I follow, Imagine That!, has jsut posted some fabulous information for all you Design Studio ladies!
Having trouble figuring out welding, contour, mirror image, searching the library, knowing what carts you used, and other stuff? This post will definitely answer those questions for you! Click HERE to read all the tips & tricks!
I'll be honest with you, I don't use Design Studio all that often, because I can't figure a lot of it out. Now, I can't wait to play around even more with Design Studio!
The Friday (.cut) Files - 1/21/11
Cutie Puppy
Click HERE to download this adorable file!
You will be able to use the solid puppy as a background for the outlined puppy. The flower wreath (in purple) will be laid over the solid wreath. This will give you some dimension.

CARTRIDGES: Pooh & Friends, Paper Pups, Hello Kitty Font
Tuesday Tutorial - January 2011
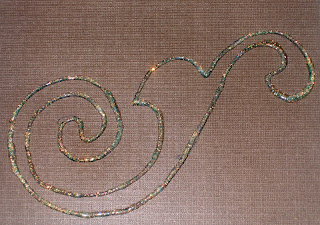
I wanted to show you how I created my "free-form" Stickle Flourish on my "So Sweet" layout. You can do this technique directly on your layout or on a separate piece of paper/cardstock. I suggest that until you are more comfortable with this technique, you try this out separate from your layout.
SUPPPLIES NEEDED:
*your template*
it does not have to be the exact same one I used. any template will do so long as you can trace
*a black pen/marker*
one that does not bleed
*stickles*
any color you choose
*your paper*
preferably cardstock as this will not buckle under the pressure of the stickles

Once you have gathered your supplies, you are ready!
Simply, lay your stencil down on your chosen paper and begin to trace

Once you are done, this is what you should see

Now, you are ready to apply your Stickles! Very carefully trace over your black line with the Stickles glue. Be careful not to lay the bottle tip directly on the paper. You want it to hover over the paper just enough to get the stickles out. This will create a ridge and give you dimension.

Once you have complete tracing your drawing this is what you will have! You may need to carefully "go over" some parts with the Stickles to even out the look. Otherwise, you can leave it as is.
Now, the next step is always the hardest! WAIT for it to dry!
Once it's dry, you have a few options. If you didn't apply this directly to your page, but on a separate piece of paper/cardstock, then you can carefully cut around it. You could also use some Liquid Glass to fill in the center. Get creative! Let me see what you do!
The Friday (.cut) Files - 1/7/11
Time for a little Design Studio .cut File! I hope you like it! Use it as your wish and then post your creation below the post!

Cartridges used: Ashlynn's Alphabet
Click HERE to download this file!
Subscribe to:
Posts (Atom)