Can an Armoir or Entertainment Center be used to store your supplies? According to Scrapbooks, Etc., they sure can! Click HERE to see what they suggest! You can also try using an old china hutch!
Get creative and be sure to add your own touch by painting, staining or antiquing your new storage space!
Showing posts with label scrapbooks etc. Show all posts
Showing posts with label scrapbooks etc. Show all posts


What kind of Scrap Room do you want?
Have you thought of this? When you decide what kind of space you want to scrap in and then turn it into that, you will find how much easier and peaceful your space is to use. When you're in a happy space, you are in a happy place.
A basement room, an attic room, dining room, black and white, vintage.....you name it! Get some ideas and get to YOUR perfect scrap room! Check out THESE different scrap rooms to get you started!!
While there, check out other storage solutions suggested by Scrapbooks, Etc.
A basement room, an attic room, dining room, black and white, vintage.....you name it! Get some ideas and get to YOUR perfect scrap room! Check out THESE different scrap rooms to get you started!!
While there, check out other storage solutions suggested by Scrapbooks, Etc.
Store it in your closet!
Again, Scrapbooks, Etc. has come up with another innovative way to store your much needed supplies!
There are so many ways to store your supplies. In a roller cart, a tote, a table and so many more! Here's just one more you can give a try.
If you have a spare closet, this is perfect for you! If you don't have a spare closet, find one! This is a great way to store and organize for easy use!
Click HERE to see what you can do with an empty closet!
There are so many ways to store your supplies. In a roller cart, a tote, a table and so many more! Here's just one more you can give a try.
If you have a spare closet, this is perfect for you! If you don't have a spare closet, find one! This is a great way to store and organize for easy use!
Click HERE to see what you can do with an empty closet!
Inexpensive and Creative Storage
Looking for some inexpensive and creative ways to store your scrapbooking supplies? Scrapbooks, Etc. has some really great ideas! Click HERE to see what they have suggested!
Adding Text and Color to Your Template
You may not want to use every available spot of your template or want to do something a little different.
Here are a few simple instructions for you to follow.
Insert your pictures following THESE DIRECTIONS.


I hope this tutorial was quick and easy to follow. Play around with these available functions and see what you can come up with!
Altering your Collage Template
Here are some simple instructions on how to alter the look of your collage template.
For instructions on how to add pictures, click HERE.


For instructions on how to add pictures, click HERE.


Drag/Drop Templates
I have recently been made aware of online drag/drop collages. I got this collage from Scrapbooks Etc. They have some great tutorials and a wonderful message board for additional questions.
Here is how I was able to create my own collage using PSE 4.0
**************************
Open the template in PSE (or other photo editing software)

Open your chosen pictures
Click on the arrow with the plus sign
Choose Layer; Group With Previous

This will put your picture "inside" the template as such:

Now, you need to resize your picture so it fits nicely within the template.
You will hold down your SHIFT key on your keyboard; place your mouse arrow over a corner of the picture; left click. Hold down both shift AND left clicker as you drag the mouse until your picture is the size you want.
To move the picture within teh template, place your arrow over the center dot of the picture; left click and drag until the picture is properly placed.

Now you can click on the little green arrow to accept
Now go to the left and choose the Marquee tool

Create a box around the part of the picture you want to remove

Click DELETE on your keyboard. This will remove any part of that picture that is within the marquee square.
Continue this process until all your pictures are placed and sized as you like.
When you are finished, click on Layer; Flatten Image. This will group everything together so it is just one single picture. Make sure everything is as you like it.

You can now save your file. Go to File; Save As.

Choose the folder in which you want to save this picture.

Make sure you rename your file as you want.
Don't forget to change your file format to .JPEG

And, there you go! Your completed collage!

Now, you can print this out as you would with all your other pictures. You can send this off to online printing service (Target, WalMart, CVS, Kodak, etc) and choose the size you like. You can print at home too using photo paper and choosing a size that is no bigger than 7.5x11
I hope this helps you do more with your digital programs and photo editing software!
Lollipop Cards
This is such a wonderful idea! A great way to use up scraps too! I wish I could tae credit for this, but I can't. This came from Scrapbooks.etc Feb 2010 issue.
To cook up this delicious design, layer a punched circle over a scalloped circle with adhesive foam. Attach the circles to the fron tof the plastic-wrapped lollipop, add another scalloped circle to the back and embellish. Use an adhesive dot to secure the ribbon leaves.
 I was going to do this for my son's class, but decided to make a flower boquet for his teacher instead!
To cook up this delicious design, layer a punched circle over a scalloped circle with adhesive foam. Attach the circles to the fron tof the plastic-wrapped lollipop, add another scalloped circle to the back and embellish. Use an adhesive dot to secure the ribbon leaves.
 I was going to do this for my son's class, but decided to make a flower boquet for his teacher instead!
Paper Piecing for a Whole Year
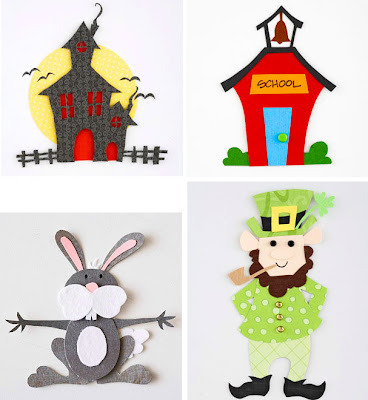
Scrapbooks Etc has some easy, downloadble patterns for an entire year!
Check it out HERE!
Below are just a few samples of what you can make!
Check it out HERE!
Below are just a few samples of what you can make!

Hate Using Plain Ol' Chipboard?
Cover it! Yup, just cover it!
Now, you can cover chipboard with just about anything you can think of, so long as you use the right adhesive. But I'm going to give you some instructions I found in the July 2008 issue of Scrapbooks Etc on how to cover your chipboard with tissue paper!
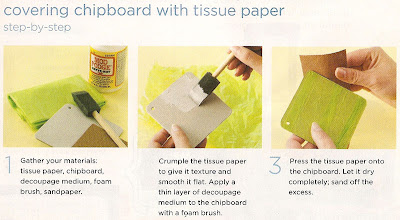
Now, you can cover chipboard with just about anything you can think of, so long as you use the right adhesive. But I'm going to give you some instructions I found in the July 2008 issue of Scrapbooks Etc on how to cover your chipboard with tissue paper!

Using Water Color Pencils
Using water color pencils is not easy when you're not sure what you need to do. I should know. I've messed up a stamped image or two (or more) because I had no idea what I was doing.
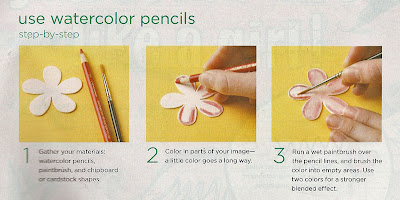
Well In the April 2007 issue of Scrapbooks Etc. I found this great demonstration. Now, I'm one of those people that needs to SEE how something works to understand it. So, I really hope this helps you out!
If you can't read the print on the picture very well, just click on the picture for a much larger view.
Well In the April 2007 issue of Scrapbooks Etc. I found this great demonstration. Now, I'm one of those people that needs to SEE how something works to understand it. So, I really hope this helps you out!
If you can't read the print on the picture very well, just click on the picture for a much larger view.

Pens & Markers 101
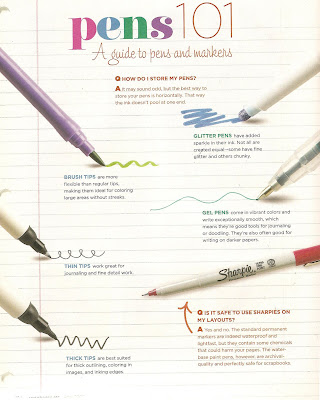
I found this guide to pens and markers in an old Scrapboks Etc. magazine. Check it out! It's from the April 2007 issue!
Be sure to click on the picture for a much larger and clearer view.
Be sure to click on the picture for a much larger and clearer view.

Subscribe to:
Posts (Atom)