One of the blogs I follow, Imagine That!, has jsut posted some fabulous information for all you Design Studio ladies!
Having trouble figuring out welding, contour, mirror image, searching the library, knowing what carts you used, and other stuff? This post will definitely answer those questions for you! Click HERE to read all the tips & tricks!
I'll be honest with you, I don't use Design Studio all that often, because I can't figure a lot of it out. Now, I can't wait to play around even more with Design Studio!
Showing posts with label tips. Show all posts
Showing posts with label tips. Show all posts


Have Fun With Blender Pens
Woo-Hoo! I've been wondering how to use these cool pens, but just now found a tutorial. I found this video on ChicknScratch's video blog!
The Original Crop-A-Dile
Wanna know how to use the original Crop-A-Dile before you go out and buy one? Well, MadScapperGirl has show us how easy it is to use this versatile tool!
A Plethera Of Techniques
Check out this amazing video where Jennifer McGuire shows off a handful of wonderful techniques.
Thanks Jennifer for the wonderful tutorial!
Thanks Jennifer for the wonderful tutorial!
Basic Techniques For Vellum
Vellum papers add a unique touch to any album page. From formal wedding and anniversary photos to frosty winter wonderland layouts, vellum can transform solid papers and customize patterned paper.
Because vellum is such a specialty paper, there are tricks to working with it. Vellum is not as porous as your other scrapbooking papers, so adhesives and inks won’t be absorbed as quickly. And because vellum paper is so transparent, most adhesive will show through. Once you know the tricks, you’ll find that creating wonderful vellum pages is pretty easy.
A few tips:
Handle with care. Vellum is beautiful because it is so delicate. And because it’s so delicate, it also requires special attention. As with any light–colored paper, smudges and creases show up more easily than on dark paper; vellum will be protected if stored inside the book it came in or in a file folder.
Picking Paper. When selecting paper to place under a white vellum overlay, choose the brightest patterns and colors. These will show up more clearly than a pale or very dark color. White vellum is also perfect for softening a paper pattern that’s too bright for your photo.
Pastel vellum transforms solid and patterned papers—slip a few different papers under your colored vellum sheet to discover just how many dramatic looks there are. Part of the fun of working with vellum is the delight of finding just the right combination, so play and experiment with your papers to see what you like best.
Vellum for journaling. Vellum provides a wonderful journaling option, as it allows for perfect tracing. Simply lay the sheet of vellum over the alphabet you want and trace with a pen. Because vellum isn’t as porous as regular paper, the ink often “sits” on top. Try journaling with Zig Writers, Sakura pens, Zebra’s Jimnie Gel Rollerball and Pentel Gel Rollers. Whatever you do, always let the piece dry for a few minutes before working with it.
For an extra-special effect, color with chalk, markers or colored pencils on the reverse side of a sheet of white vellum. Chalks and colored pencils will give a soft, muted look, while markers can produce a stained-glass effect.
Vellum and computer printers. Yes, you can run vellum through a computer printer. Just be sure to let the ink dry for a few minutes before handling. And if you’re printing multiple sheets, be sure to remove the vellum from the tray after printing.
Tearing vellum. Vellum can be torn for really beautiful borders. Torn vellum lends a soft look to a page. Go ahead, try it!
My favorite use. One of my favorite ways to use vellum is to mat my photos with it. I mat my photo onto a solid paper, then onto vellum—this time, I cut the border a bit larger so the vellum shows up. Then I place the matted photo onto the background paper, applying adhesive only behind the photo. It gives an extra-special look to special pages.
Brought to you by: LeNae Gerig from Scrapbooking 101
Because vellum is such a specialty paper, there are tricks to working with it. Vellum is not as porous as your other scrapbooking papers, so adhesives and inks won’t be absorbed as quickly. And because vellum paper is so transparent, most adhesive will show through. Once you know the tricks, you’ll find that creating wonderful vellum pages is pretty easy.
A few tips:
Handle with care. Vellum is beautiful because it is so delicate. And because it’s so delicate, it also requires special attention. As with any light–colored paper, smudges and creases show up more easily than on dark paper; vellum will be protected if stored inside the book it came in or in a file folder.
Picking Paper. When selecting paper to place under a white vellum overlay, choose the brightest patterns and colors. These will show up more clearly than a pale or very dark color. White vellum is also perfect for softening a paper pattern that’s too bright for your photo.
Pastel vellum transforms solid and patterned papers—slip a few different papers under your colored vellum sheet to discover just how many dramatic looks there are. Part of the fun of working with vellum is the delight of finding just the right combination, so play and experiment with your papers to see what you like best.
Vellum for journaling. Vellum provides a wonderful journaling option, as it allows for perfect tracing. Simply lay the sheet of vellum over the alphabet you want and trace with a pen. Because vellum isn’t as porous as regular paper, the ink often “sits” on top. Try journaling with Zig Writers, Sakura pens, Zebra’s Jimnie Gel Rollerball and Pentel Gel Rollers. Whatever you do, always let the piece dry for a few minutes before working with it.
For an extra-special effect, color with chalk, markers or colored pencils on the reverse side of a sheet of white vellum. Chalks and colored pencils will give a soft, muted look, while markers can produce a stained-glass effect.
Vellum and computer printers. Yes, you can run vellum through a computer printer. Just be sure to let the ink dry for a few minutes before handling. And if you’re printing multiple sheets, be sure to remove the vellum from the tray after printing.
Tearing vellum. Vellum can be torn for really beautiful borders. Torn vellum lends a soft look to a page. Go ahead, try it!
My favorite use. One of my favorite ways to use vellum is to mat my photos with it. I mat my photo onto a solid paper, then onto vellum—this time, I cut the border a bit larger so the vellum shows up. Then I place the matted photo onto the background paper, applying adhesive only behind the photo. It gives an extra-special look to special pages.
Brought to you by: LeNae Gerig from Scrapbooking 101
Spiral Flowers Are A Hit
 Ashley, from Have Your Way With Paper, forwarded us a link for some cool spiral flowers.
 Here are the instructions:
1.) Draw a spiral on a 4×4” piece of paper. You can vary the size of your end product by changing the size of the paper. As well, the tighter the spiral, the more layers the end product will have

2.) Cut out the spiral along the lines. I’ve seen these also made with wavy lines, by tearing the spiral out, and you could even try deco scissors for a different look.

3.) Place a glue dot on the outside end of the spiral and begin rolling from the outside. The glue dot will help the flower to not unravel.

4.) Keep rolling until the end. The last bit sometimes doesn’t want to go so I just cut it off. Let go of the flower and work the layers a bit. Put a glue dot on the end of the flower to keep it from unraveling.

5.) The finished flower!

For added texture, try ripping the paper instead of cutting and use a little inking and see what you get.
Here's the tutorial on these awesome flowers. If you attempt this technique, please share your work here and on the blog where the tutorial is shown. Thank you!
Auto Correct The Lighting In Your Picture
Clicking on the Demo Picture will enlarge it so you can see it more clearly.
Open your picture in PSE (I am using PSE 3.0)
Crop it to your liking
Click on ENHANCE
Then pick AUTO SMART FIX
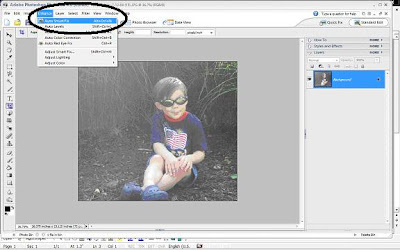
If the coloring still seems a bit off:
You can click on ENHANCE
Then ADJUST LIGHTING
Then BRIGHTNESS/CONTRAST
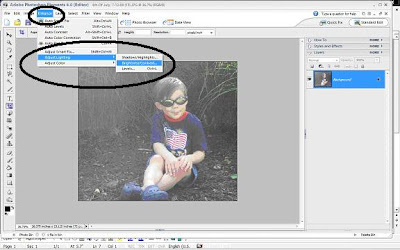
(I used brightness/contrast because I took it with too much light – you will use whatever is more fitting to our picture/preference)
Then you will slide the brightness or contrast levels around until you get the effect you want
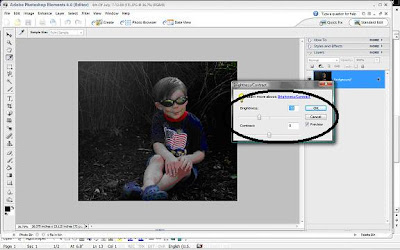
You can also use this feature to create your own background page with picture intact. Just slide the brightness and contrast to extremes
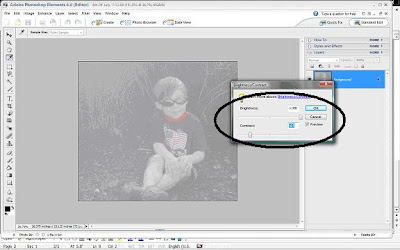
When you are satisfied with your project, don’t forget to go to FILE and SAVE AS
Open your picture in PSE (I am using PSE 3.0)
Crop it to your liking
Click on ENHANCE
Then pick AUTO SMART FIX

If the coloring still seems a bit off:
You can click on ENHANCE
Then ADJUST LIGHTING
Then BRIGHTNESS/CONTRAST

(I used brightness/contrast because I took it with too much light – you will use whatever is more fitting to our picture/preference)
Then you will slide the brightness or contrast levels around until you get the effect you want

You can also use this feature to create your own background page with picture intact. Just slide the brightness and contrast to extremes

When you are satisfied with your project, don’t forget to go to FILE and SAVE AS
Make it Yourself!
When wanting shaped papers and or Diecuts I always buy one and trace the pattern on back of the cardstock or paper that I want the shape on then cut it out.Always keep a pattern so when you can't find that certain shape in the pattern or color you want you make your own.
Also If you see a great pattern paper that has pictures you like Cut them out glitter them up and you have a instant Embellishment..
Brought to you by: Scrapbook Deals 4 U
Also If you see a great pattern paper that has pictures you like Cut them out glitter them up and you have a instant Embellishment..
Brought to you by: Scrapbook Deals 4 U
Subscribe to:
Posts (Atom)