One of the blogs I follow, Imagine That!, has jsut posted some fabulous information for all you Design Studio ladies!
Having trouble figuring out welding, contour, mirror image, searching the library, knowing what carts you used, and other stuff? This post will definitely answer those questions for you! Click HERE to read all the tips & tricks!
I'll be honest with you, I don't use Design Studio all that often, because I can't figure a lot of it out. Now, I can't wait to play around even more with Design Studio!
Showing posts with label tricks. Show all posts
Showing posts with label tricks. Show all posts


Make it Yourself!
When wanting shaped papers and or Diecuts I always buy one and trace the pattern on back of the cardstock or paper that I want the shape on then cut it out.Always keep a pattern so when you can't find that certain shape in the pattern or color you want you make your own.
Also If you see a great pattern paper that has pictures you like Cut them out glitter them up and you have a instant Embellishment..
Brought to you by: Scrapbook Deals 4 U
Also If you see a great pattern paper that has pictures you like Cut them out glitter them up and you have a instant Embellishment..
Brought to you by: Scrapbook Deals 4 U
Alphabet Stickers Used Twice
When you buy a sheet of alphabet stickers, be very careful when removing them so as not to damage the area around the sticker. When the letter stickers are removed, there is a color border left over that matches the sticker used. Once you have used the most popular letters, cut the background into small squares, or various shapes, leaving the colored outline of the letter in each block. Now you have a whole new set of alphabet stickers!
Journaling on Small Vellum
Here's a nifty trick for successfully printing on smaller pieces of vellum or scraps of cardstock. Print your text onto a sheet of plain letter-size paper. Now adhere a small piece of vellum or transparency over the text with removable tape, adhering only edges that will feed into the printer first. Return the paper to the printer and print the text again. You're guaranteed to have perfectly lined up text on a small piece of vellum or transparency.
Using Your Eyelets
1. Map out your vacation route with fiber threaded through eyelets.
2. Use as laces on paper pieced-shoes.
3. Make a frame around a matted photo or journal box.
4. Tie through the hole of a tag.
5. Use in a sports scene as a basketball hoop, soccer net or fishing pole.
6. Create grass or trees.
7. Spell out a title using fibers to stitch out the letters.
8. Wrap around a border, nugget, tag or corner accent several times.
9. Make hair or other features on paper dolls.
10. Use as a string for balloon die cuts or eyelets.
11. Tie lassos for western pages.
12. Create seaweed on an ocean or vacation page.
13. Attach a tail to a kite.
14. Build a mountain/water outline.
15. Use a rope for a tug of war scene.
16. Fringe on animals.
17. Wrap fibers around letters.
18. Create a shadow for die cut letters.
19. Use fibers to tie 2 or more elements together.
20. Create bows.
21. Scarf on a paper pieced snowman.
22. Attach to a brad and use it as a yoyo.
23. Fiber piecing. See http://www.fiberscraps.com
24. Used to stitch pieces together to form a pocket.
25. As embroidery stitching.
26. Attach tire (swing) to tree.
27. Wrapping presents.
28. Crossing corners of a photo mat or journal box.
29. Clothesline for hanging mittens with wooden clothespins.
30. Stitching a template design.
31. Thread punchies on fiber and create a bracelet around a photo/mat.
32. Down the length of the page, photo mat or journal box as a border.
33. To hang/attach buttons or charms.
34. Used to hang signs or metal-rimmed tags from buttons, brad and eyelets.
35. Decorations on a Christmas tree.
36. Decorations on an Easter Egg.
37. Create a spider web.
38. Lacing 2 pieces together.
39. Ends of a hammock.
40. Wind fibers tightly to form the center of a flower or leaves.
41. To knit or crochet page accents.
42. As a blanket stitch around a border, or mat.
43. Tassels.
44. Braiding the fibers together to create borders, page breaks etc.
45. As needlepoint stitches on your page elements.
46. Hanging header letter squares or mini tags.
47. Enhancing die cuts
48. Accent on Serendipity Squares.
49. Weave through mesh.
2. Use as laces on paper pieced-shoes.
3. Make a frame around a matted photo or journal box.
4. Tie through the hole of a tag.
5. Use in a sports scene as a basketball hoop, soccer net or fishing pole.
6. Create grass or trees.
7. Spell out a title using fibers to stitch out the letters.
8. Wrap around a border, nugget, tag or corner accent several times.
9. Make hair or other features on paper dolls.
10. Use as a string for balloon die cuts or eyelets.
11. Tie lassos for western pages.
12. Create seaweed on an ocean or vacation page.
13. Attach a tail to a kite.
14. Build a mountain/water outline.
15. Use a rope for a tug of war scene.
16. Fringe on animals.
17. Wrap fibers around letters.
18. Create a shadow for die cut letters.
19. Use fibers to tie 2 or more elements together.
20. Create bows.
21. Scarf on a paper pieced snowman.
22. Attach to a brad and use it as a yoyo.
23. Fiber piecing. See http://www.fiberscraps.com
24. Used to stitch pieces together to form a pocket.
25. As embroidery stitching.
26. Attach tire (swing) to tree.
27. Wrapping presents.
28. Crossing corners of a photo mat or journal box.
29. Clothesline for hanging mittens with wooden clothespins.
30. Stitching a template design.
31. Thread punchies on fiber and create a bracelet around a photo/mat.
32. Down the length of the page, photo mat or journal box as a border.
33. To hang/attach buttons or charms.
34. Used to hang signs or metal-rimmed tags from buttons, brad and eyelets.
35. Decorations on a Christmas tree.
36. Decorations on an Easter Egg.
37. Create a spider web.
38. Lacing 2 pieces together.
39. Ends of a hammock.
40. Wind fibers tightly to form the center of a flower or leaves.
41. To knit or crochet page accents.
42. As a blanket stitch around a border, or mat.
43. Tassels.
44. Braiding the fibers together to create borders, page breaks etc.
45. As needlepoint stitches on your page elements.
46. Hanging header letter squares or mini tags.
47. Enhancing die cuts
48. Accent on Serendipity Squares.
49. Weave through mesh.
Dress Up Your Title
I found myself doing the same thing over and over again. I found I kept putting 3 little dots on every letter. Now, I like that concept, but I realized I did it on just about every layout I was doing. So, I asked the gals on Have Your Way With Paper and here are those ideas:
1. Try leaving them be, using two (or more) different sets of thickers, using some thickers, some flat stickers/cricut cut alphas...I've inked the edges of thickers before - Lisa
2. I love mixing fonts, colors, and textures in my titles. :) It's fun to use rub-ons or something for most of the words and then pick one key word to be chipboard of foam or something that really stands out - Jenny
3. I like to tie a little ribbon around a chipboard letter on a title - Elaine
4. Use your ribbons and fibers especially around chipboard - Krissy
5. Stickles, glitter, paint, alchohol inks (only works if the letters are shiny). - Cheryl
1. Try leaving them be, using two (or more) different sets of thickers, using some thickers, some flat stickers/cricut cut alphas...I've inked the edges of thickers before - Lisa
2. I love mixing fonts, colors, and textures in my titles. :) It's fun to use rub-ons or something for most of the words and then pick one key word to be chipboard of foam or something that really stands out - Jenny
3. I like to tie a little ribbon around a chipboard letter on a title - Elaine
4. Use your ribbons and fibers especially around chipboard - Krissy
5. Stickles, glitter, paint, alchohol inks (only works if the letters are shiny). - Cheryl
Save A Buck or Two!
In this economy we are all trying to get the most out of what we have on hand. I love getting a kit in the mail for this reason. But sometimes the color of an embellishment is not what I am looking for. Don't be afraid to alter your embellishments so that they work with your project. It can be something simple such as a light sanding. Don't be afraid to use your markers, glitter pens, stickles, etc.
Brought to you by: Scrapbook Deals 4 U
Brought to you by: Scrapbook Deals 4 U
Making Pix B/W With A Little Color
Clicking on the demo photos will enlarge them in a separate window so you can see more clearly
With you picture already chosen:
Click on the black ad white circle in the layers menu and choose hue/saturation
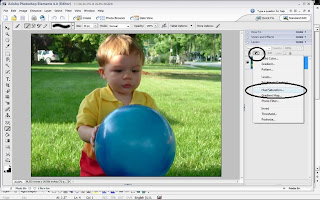
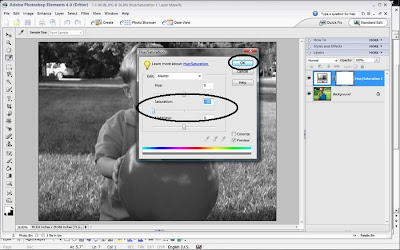
In the pop-up box, slide saturation all the way to the left. This will turn your picture black and white. Click OK.
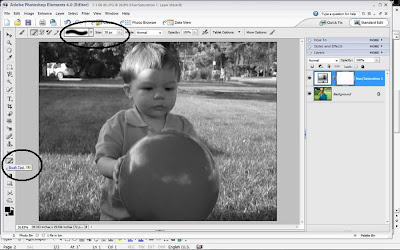
Choose the brush tool.
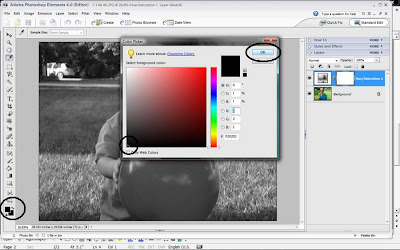
Make sure your fore ground color is black. Click OK.
While holding down the left mouse button brush over the part of your pic you want to be colorized. The color will return.
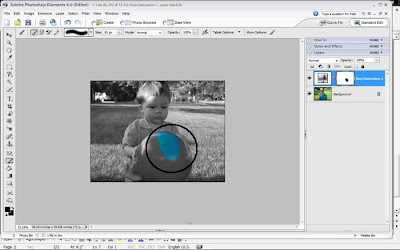
Now, if you don’t want the original color to come back quite as bright, click on the opacity button and adjust it down to your liking. Brush over the area and see the difference.
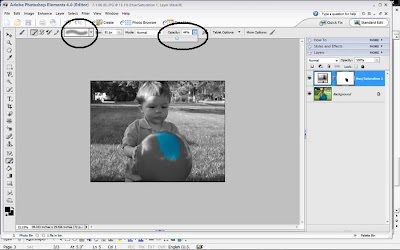
If you happen to accidentally brush over an area you don't want colorized, you can do one of two things. You can go up to edit and click on undo. Or, you make your fore ground color white and brush over that area and it will return to black and white.
When you’re done, save your pic using "save as: so you don’t save over your original picture.
Directions provided by: Scrapbook Memories
Give this technique a try and send me your completed works of art. I will be happy to show them off here. Don't forget to include a link to your blog/website!
Enjoy and have fun!!
With you picture already chosen:
Click on the black ad white circle in the layers menu and choose hue/saturation

In the pop-up box, slide saturation all the way to the left. This will turn your picture black and white. Click OK.

Choose the brush tool.

Make sure your fore ground color is black. Click OK.

While holding down the left mouse button brush over the part of your pic you want to be colorized. The color will return.

Now, if you don’t want the original color to come back quite as bright, click on the opacity button and adjust it down to your liking. Brush over the area and see the difference.

If you happen to accidentally brush over an area you don't want colorized, you can do one of two things. You can go up to edit and click on undo. Or, you make your fore ground color white and brush over that area and it will return to black and white.
When you’re done, save your pic using "save as: so you don’t save over your original picture.
Directions provided by: Scrapbook Memories
Give this technique a try and send me your completed works of art. I will be happy to show them off here. Don't forget to include a link to your blog/website!
Enjoy and have fun!!
Wild Card Sizing
One of my gal pals, Robin from Have Your Way With Paper, played around with the Cricut Wild Card cartridge. She came up with a great way to get the card to fit the envelope. Check this out!
I was playing with it last evening and I figured out a trick for sizing. Cause it is hard to just guess the sizes. you start with the envelope cut and a 12x12 paper and push fit to paper button. It will then size it automatically to the paper and a number will flash on the screen (3 3/4" for instance ). Then you know what size to make the rest of the parts of the card. They will all cut and fit to that size envelope if you set it at 3 3/4". Each shape card will ideally be a different size number.
I was playing with it last evening and I figured out a trick for sizing. Cause it is hard to just guess the sizes. you start with the envelope cut and a 12x12 paper and push fit to paper button. It will then size it automatically to the paper and a number will flash on the screen (3 3/4" for instance ). Then you know what size to make the rest of the parts of the card. They will all cut and fit to that size envelope if you set it at 3 3/4". Each shape card will ideally be a different size number.
Some Tricks of the Trade
For some extra scrapbooking ideas, here are a few tips:
• You don't have to mat every single photo on your scrapbook layout, unless you want it to stand out from the background.
• Wrap ribbons around your focal-point photo to add emphasis.
• Customize your patterned paper by layering a piece of vellum or printed transparency over it.
• Tips on choosing pens: pick a fine-tipped pen for a simple look, a bolder pen for a casual look. Have different sizes on hand and experiment.
• Create easy scrapbooking borders on your pages by attaching a strip of ribbon.
• Looking for a way to store your little eyelets, brads, and other scrapbooking supplies? You can get a 7-day vitamin container and store all your tiny embellishments into different compartments.
• For a smart scrapbooking border, print out the names of the people who appeared on the layout onto that strip of border.
• Whether you are at cafes, restaurants, shopping, or just out for a walk, keep your surroundings in mind. They often inspire fun scrapbooking ideas.
• Since they're easy to apply, keep yourself from pasting to many scrapbooking stickers. There is a chance of overloading your page.
• You don't have to mat every single photo on your scrapbook layout, unless you want it to stand out from the background.
• Wrap ribbons around your focal-point photo to add emphasis.
• Customize your patterned paper by layering a piece of vellum or printed transparency over it.
• Tips on choosing pens: pick a fine-tipped pen for a simple look, a bolder pen for a casual look. Have different sizes on hand and experiment.
• Create easy scrapbooking borders on your pages by attaching a strip of ribbon.
• Looking for a way to store your little eyelets, brads, and other scrapbooking supplies? You can get a 7-day vitamin container and store all your tiny embellishments into different compartments.
• For a smart scrapbooking border, print out the names of the people who appeared on the layout onto that strip of border.
• Whether you are at cafes, restaurants, shopping, or just out for a walk, keep your surroundings in mind. They often inspire fun scrapbooking ideas.
• Since they're easy to apply, keep yourself from pasting to many scrapbooking stickers. There is a chance of overloading your page.
Subscribe to:
Posts (Atom)