Here's a quick tutorial on how to "de-stick" stamps in order to use them on your pages!
Showing posts with label tuesday tutorial. Show all posts
Showing posts with label tuesday tutorial. Show all posts


Tuesday Tutorial - March 2011
COASTER FLOWERS
Here is another tutorial for you! I hope you enjoy it!
I did another video for you where I completed my coaster flower with a few embellies! Remember, you can always add your own little touches!
I thought i'd treat you to a few additional pix too! My son, Nathan, decided he wanted to make his own coaster flower while I was making mine! Unfortunately, before I got to take a pic, he had already misplaced his project! You would have loved it! Next time, I will just take the pic immediately after we are done.
Tuesday Tutorial - February 2011
I saw this once and it really works well! You will have to use one of the hand-held Dymo Label makers
(like the old fashioned ones).
This video is a tutorial I did a while back, but it seems to have a great response! It's an Oldie but a Goodie!
Supplies needed:
original Dymo label maker
scrap strips of paper (with white core backing) about 3/8" wide
sanding block
Some of these hand held Dymos have different "wheels" which can be interchanged for different fonts and characters. Walmart and Target seem to have had the best selection and best prices. You can also go to an office supply store for a wider selection.
This is also a great way to use up some of those scraps!
Have fun and enjoy!
Tuesday Tutorial - January 2011
I wanted to show you how I created my "free-form" Stickle Flourish on my "So Sweet" layout. You can do this technique directly on your layout or on a separate piece of paper/cardstock. I suggest that until you are more comfortable with this technique, you try this out separate from your layout.
SUPPPLIES NEEDED:
*your template*
it does not have to be the exact same one I used. any template will do so long as you can trace
*a black pen/marker*
one that does not bleed
*stickles*
any color you choose
*your paper*
preferably cardstock as this will not buckle under the pressure of the stickles

Once you have gathered your supplies, you are ready!
Simply, lay your stencil down on your chosen paper and begin to trace

Once you are done, this is what you should see

Now, you are ready to apply your Stickles! Very carefully trace over your black line with the Stickles glue. Be careful not to lay the bottle tip directly on the paper. You want it to hover over the paper just enough to get the stickles out. This will create a ridge and give you dimension.

Once you have complete tracing your drawing this is what you will have! You may need to carefully "go over" some parts with the Stickles to even out the look. Otherwise, you can leave it as is.
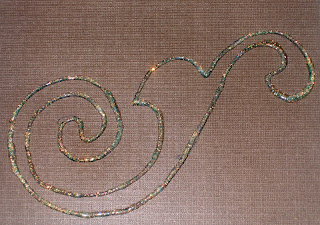
Now, the next step is always the hardest! WAIT for it to dry!
Once it's dry, you have a few options. If you didn't apply this directly to your page, but on a separate piece of paper/cardstock, then you can carefully cut around it. You could also use some Liquid Glass to fill in the center. Get creative! Let me see what you do!
Journaling Strip with Dymo
I saw this once and it really works well! You will have to use one of the hand-held Dymo Label makers (like the old fashioned ones).
Don't forget to use a sanding block to lightly sand the top of the strip so the letters pop out.
Some of these hand held Dymos have different "wheels" which can be interchanged for different fonts and characters. Walmart and Target seem to have had the best selection and best prices. You can also go to an office supply store for a wider selection.
This is also a great way to use up some of those scraps!
Have fun and enjoy!
Don't forget to use a sanding block to lightly sand the top of the strip so the letters pop out.
Some of these hand held Dymos have different "wheels" which can be interchanged for different fonts and characters. Walmart and Target seem to have had the best selection and best prices. You can also go to an office supply store for a wider selection.
This is also a great way to use up some of those scraps!
Have fun and enjoy!
Subscribe to:
Posts (Atom)