to use your CRICUT! OMG! You have GOT to check this out. I would NEVER have thought to do this!
Crafty Steals: We're taking you to school this Sunday!: "Good morning Crafty Stealers! We’ve decided to do something new on the Crafty Steals blog. We’re going to start making every Sunday ..."


Personalized Storage
This is featured over at Kaiser Crafties. . This is just such an awesome idea, I wanted to share it with you. This is created for sewing storage but, I think this could also work for desktop scrapbooking storage as well.
Give it a shot and send me your creation. I will share your completed work along with a link back to our blog and I will also forward it on to Beyond The Page. It is their creation, after all.

Be sure to check out all the other awesome stuff on their blog!!!
Dont' forget, no matter what it is that you use to store all your scrapbook supplies and papers, you can always personalize it. Use your creativity and your supplies and go for it! Let me know what you come up with! I would love to show others your wonderful ideas!
Bling
There aren't too many different ways you can store these, really, but this is what I have come up with so far.
1. ziploc baggies (the tiny ones for jewelry or the snack size ones)
2. 3-ring binder with baseball card holders (if you have lots of bling)
1. ziploc baggies (the tiny ones for jewelry or the snack size ones)
2. 3-ring binder with baseball card holders (if you have lots of bling)
My Kind Of Scrap Room
Here is a video I found at Better Homes and Gardens of an awesome basement scrap room. I wish I could have one like this. Although, it probably wouldn't stay that neat.
" So, I think this space uses a great use of creative solutions. It's all about storage, for example, so that if you're doing a craft project, you have trash easily accessible. If you wanna sew, you could bring your sewing machine out here and you can do sewing right out here, a quilt maker. If you're a crafter, if you're a scrapbook maker, you... "
Click HERE for the Video!
" So, I think this space uses a great use of creative solutions. It's all about storage, for example, so that if you're doing a craft project, you have trash easily accessible. If you wanna sew, you could bring your sewing machine out here and you can do sewing right out here, a quilt maker. If you're a crafter, if you're a scrapbook maker, you... "
Click HERE for the Video!
The Friday (.cut) Files - 2/18/11

CARTRIDGES USED: Graphically Speaking, Home Decor
Here's an elegant frame for that special picture! Download this file for your project and then link your project to your blog/site below! I would love to see what you did with it!
Cricut Booklet Storage
I finally figured out what I wanted! I love this! It's so versatile and perfect if you plan on adding to your cricut collection!
Scrapbook Paper Storage
CHEAP personalized paper storage containers? Yup! It's true and so very easy and possible!
I found this great tutorial on blnken1's You Tube channel. Click on the video title to view her channel
Easy Tub Storage
Check this out! A great new, easy, inexpensive and fun way to store so much!
Thank you Robin Stamps for this great idea!
Thank you Robin Stamps for this great idea!
Marion's Scrap/Craft Room (aka---scraft room)
For those of you interested in creating an amazing scrap room to be your creative best, here is a great video of Marion showing off her own scrap room. Be sure to visit her channel, A Piece of Craft, on You Tube! She has some fantastic tutorials and does a lot of LIVE shows too! She is one very talented lady and has a lot of inspiration to share!
This is what I envision MY ultimate scrap room to look like.......one day!
Tuesday Tutorial - February 2011
I saw this once and it really works well! You will have to use one of the hand-held Dymo Label makers
(like the old fashioned ones).
This video is a tutorial I did a while back, but it seems to have a great response! It's an Oldie but a Goodie!
Supplies needed:
original Dymo label maker
scrap strips of paper (with white core backing) about 3/8" wide
sanding block
Some of these hand held Dymos have different "wheels" which can be interchanged for different fonts and characters. Walmart and Target seem to have had the best selection and best prices. You can also go to an office supply store for a wider selection.
This is also a great way to use up some of those scraps!
Have fun and enjoy!
The Friday (.cut) Files - 2/4/11
A beautiful Dragonfly Frame for you!

Cartridges: Doodlecharms, Stretch Your Imagination
Cricut Design Studio, Tips & Tricks
One of the blogs I follow, Imagine That!, has jsut posted some fabulous information for all you Design Studio ladies!
Having trouble figuring out welding, contour, mirror image, searching the library, knowing what carts you used, and other stuff? This post will definitely answer those questions for you! Click HERE to read all the tips & tricks!
I'll be honest with you, I don't use Design Studio all that often, because I can't figure a lot of it out. Now, I can't wait to play around even more with Design Studio!
Having trouble figuring out welding, contour, mirror image, searching the library, knowing what carts you used, and other stuff? This post will definitely answer those questions for you! Click HERE to read all the tips & tricks!
I'll be honest with you, I don't use Design Studio all that often, because I can't figure a lot of it out. Now, I can't wait to play around even more with Design Studio!
The Friday (.cut) Files - 1/21/11
Cutie Puppy
Click HERE to download this adorable file!
You will be able to use the solid puppy as a background for the outlined puppy. The flower wreath (in purple) will be laid over the solid wreath. This will give you some dimension.

CARTRIDGES: Pooh & Friends, Paper Pups, Hello Kitty Font
Tuesday Tutorial - January 2011
I wanted to show you how I created my "free-form" Stickle Flourish on my "So Sweet" layout. You can do this technique directly on your layout or on a separate piece of paper/cardstock. I suggest that until you are more comfortable with this technique, you try this out separate from your layout.
SUPPPLIES NEEDED:
*your template*
it does not have to be the exact same one I used. any template will do so long as you can trace
*a black pen/marker*
one that does not bleed
*stickles*
any color you choose
*your paper*
preferably cardstock as this will not buckle under the pressure of the stickles

Once you have gathered your supplies, you are ready!
Simply, lay your stencil down on your chosen paper and begin to trace

Once you are done, this is what you should see

Now, you are ready to apply your Stickles! Very carefully trace over your black line with the Stickles glue. Be careful not to lay the bottle tip directly on the paper. You want it to hover over the paper just enough to get the stickles out. This will create a ridge and give you dimension.

Once you have complete tracing your drawing this is what you will have! You may need to carefully "go over" some parts with the Stickles to even out the look. Otherwise, you can leave it as is.
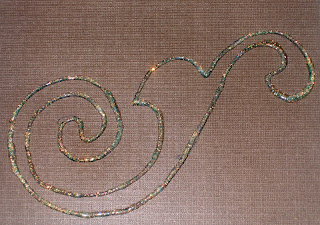
Now, the next step is always the hardest! WAIT for it to dry!
Once it's dry, you have a few options. If you didn't apply this directly to your page, but on a separate piece of paper/cardstock, then you can carefully cut around it. You could also use some Liquid Glass to fill in the center. Get creative! Let me see what you do!
The Friday (.cut) Files - 1/7/11
Time for a little Design Studio .cut File! I hope you like it! Use it as your wish and then post your creation below the post!

Cartridges used: Ashlynn's Alphabet
Click HERE to download this file!
FREE Classes!!
You want to learn new techniques using stamps, supplies, sketches and 4x6 photos? Two Peas In A Bucket is offering FREE classes to learn more about your passion and make the most of it!
Click HERE for more details on each of these FREE classes!
On the 1st of every month: Scrapbook Stamping
with Nichol Magouirk
with Nichol Magouirk
On the 10th of every month: Products You Love Every Which Way
with Shannon Tidwell
with Shannon Tidwell
On the 20th of every month: Stretch a Sketch
with Jen Gallacher
with Jen Gallacher
On the 30th of every month: 4x6 Photo Love
with Shimelle Laine
with Shimelle Laine
Click HERE for more details on each of these FREE classes!
Iris Folding Paper....Where Can I Find??
An anonymous question was posted to me: "Iris folding paper is hard to find where I am at. Help. I hear that the inside of envelops are a good thing those to hard to find here.Help"
you can buy them online here: http://www.buycheapr.com/us/result.jsp?ga=us1&q=paper+iris+folding
http://haveyourwaywithpaper.myfreeforum.org/about3857.html?sid=78a06ec74fba0545f38363a0a9ba795a
http://www.circleofcrafters.com/irisfolding/
you can also try using left over Christmas paper, oragami paper, or anything that is the same consistency. I would go ahead and try out the envelopes. I would love to see your finished product using them!!! good luck and i hope this helps you out!
Spice Up Those Boring Stickers
I found this great idea at Families.com on how to use and spice up those boring flat stickers.
...End of the season sales and discontinued lots are excellent ways to score major savings on scrapbook stickers. That's the good news. The bad news is that some deeply discounted stickers are not exactly the cutest of the bunch...
Click HERE to view to full article!
...End of the season sales and discontinued lots are excellent ways to score major savings on scrapbook stickers. That's the good news. The bad news is that some deeply discounted stickers are not exactly the cutest of the bunch...
Click HERE to view to full article!
Fancy Christmas Tree
FREE .cut file. Click HERE to download!

CARTRIDGES: Christmas, Christmas Cheer, Joys of the Season
The wreath would be hanging on the tip of the tree. "Joy" tag would hang about midway with the background adhered so you could clearly see the word, joy.
As always, please feel free to send me your creations and I will be happy to post it here with a link back to you!
Bracket Frame w/Bird
FREE .cut file for Design Studio!
Click HERE to download!
Feel free to use it to your hearts content. Send me what you created and I will be happy to post your creation here and add a link back to your site/blog.

CARTRIDGES USED: Home Accents, Home Décor, Storybook
Past & Present
Click HERE to downlod your FREE .cut file!

CARTRIDGES USED: Hello kitty font, Home décor, Graphically speaking, Wedding
Adding Text and Color to Your Template
You may not want to use every available spot of your template or want to do something a little different.
Here are a few simple instructions for you to follow.
Insert your pictures following THESE DIRECTIONS.


I hope this tutorial was quick and easy to follow. Play around with these available functions and see what you can come up with!
Altering your Collage Template
Here are some simple instructions on how to alter the look of your collage template.
For instructions on how to add pictures, click HERE.


For instructions on how to add pictures, click HERE.


Drag/Drop Templates
I have recently been made aware of online drag/drop collages. I got this collage from Scrapbooks Etc. They have some great tutorials and a wonderful message board for additional questions.
Here is how I was able to create my own collage using PSE 4.0
**************************
Open the template in PSE (or other photo editing software)

Open your chosen pictures
Click on the arrow with the plus sign
Choose Layer; Group With Previous

This will put your picture "inside" the template as such:

Now, you need to resize your picture so it fits nicely within the template.
You will hold down your SHIFT key on your keyboard; place your mouse arrow over a corner of the picture; left click. Hold down both shift AND left clicker as you drag the mouse until your picture is the size you want.
To move the picture within teh template, place your arrow over the center dot of the picture; left click and drag until the picture is properly placed.

Now you can click on the little green arrow to accept
Now go to the left and choose the Marquee tool

Create a box around the part of the picture you want to remove

Click DELETE on your keyboard. This will remove any part of that picture that is within the marquee square.
Continue this process until all your pictures are placed and sized as you like.
When you are finished, click on Layer; Flatten Image. This will group everything together so it is just one single picture. Make sure everything is as you like it.

You can now save your file. Go to File; Save As.

Choose the folder in which you want to save this picture.

Make sure you rename your file as you want.
Don't forget to change your file format to .JPEG

And, there you go! Your completed collage!

Now, you can print this out as you would with all your other pictures. You can send this off to online printing service (Target, WalMart, CVS, Kodak, etc) and choose the size you like. You can print at home too using photo paper and choosing a size that is no bigger than 7.5x11
I hope this helps you do more with your digital programs and photo editing software!
Dragonfly Frame
Another FUN FREEBIE for you!
Click HERE to download

CARTRIDGES
Doodlecharms, Stretch Your Imagination
Please know.....This file is for your own use ONLY. Please download and use it to our heart's content, share it with your friends.... Please, just be sure to send them back here. Thank you for understanding.
Please know.....This file is for your own use ONLY. Please download and use it to our heart's content, share it with your friends.... Please, just be sure to send them back here. Thank you for understanding.
Stained Glass Flower Frame
Stained Glass Flower Frame

Click HERE to download the file
CARTRIDGES:
Stretch Your Imagination
Please know.....This file is for your own use ONLY. Please download and use it to our heart's content, share it with your friends.... Please, just be sure to send them back here. Thank you for understanding.
Daisy Days
My first FREE Design Studio cut file! I hope you like it and are able to use it.

Click HERE to download the file
Cartridges: George & Basic Shapes, Mickey Font, Mickey & Friends
Please know.....This file is for your own use ONLY. Please download and use it to our heart's content, share it with your friends.... Please, just be sure to send them back here. Thank you for understanding.
ANNOUNCING.......We Have A Web Page!!!
****THIS POST NO LONGER APPLIES****
*****THE SITE NO LONGER EXISTS*****
Well, actually, it's more like a "social network." The Scrapbook Speedway has it's own ning.com web site!
I created this site so you can chat, get to know eachother better, show off your work and so much more! I have included a section especially for sketches, one for all your work and one just for your cards! You can even chat with other members who are currently online. I also plan to have monthly challenges which may or may not include prizes or giveaways!
As our family grows, so will the site! Which means more challenges, more friends and more opportunities for new creations and ideas!
Pop on over and see what it's all about!
Click HERE to visit!
Dymo Journaling
I re-filmed this tutorial hoping that it was a little more informative and easier to understand.
Notecard Mini Scrapbook Album
What a great little gift book! Inexpensive and SO easy! Check out her You Tube video!!
Paperbag Mini Album Tutorial Part 1
I LOVE this little book! Very cute! She did a tremendous job here and I wanted to share her You Tube video with you. I really want to try this out! Be sure to check out the rest of this series too!
This would be a great little gift for someone. And, I would like to think, it wouldn't take too awful long to put together!
A new kind of paper bag book
I saw this on You Tube and HAD to share it with you! This is such a creative twist on the traditional paper bag book! ENJOY!
Lollipop Cards
This is such a wonderful idea! A great way to use up scraps too! I wish I could tae credit for this, but I can't. This came from Scrapbooks.etc Feb 2010 issue.
To cook up this delicious design, layer a punched circle over a scalloped circle with adhesive foam. Attach the circles to the fron tof the plastic-wrapped lollipop, add another scalloped circle to the back and embellish. Use an adhesive dot to secure the ribbon leaves.
 I was going to do this for my son's class, but decided to make a flower boquet for his teacher instead!
To cook up this delicious design, layer a punched circle over a scalloped circle with adhesive foam. Attach the circles to the fron tof the plastic-wrapped lollipop, add another scalloped circle to the back and embellish. Use an adhesive dot to secure the ribbon leaves.
 I was going to do this for my son's class, but decided to make a flower boquet for his teacher instead!
Make Your Own Clear Embellishments
Yes you can!! Jamie from JuJu Bee's Scrapbook Corner has this amazing idea to create your own clear embellishments. I would have never thought to do this!!
The following information was taken from her post at JuJuBee's Scrapbook Corner:
I just love using all the fabulous clear/acrylic products on the market but sometimes I can't find exactly what I need, so I am going to show you how I make them myself at home!
 The first step is to save the clear plastic packaging that many products are packed in. (What a great way to recycle as well:-)
 One easy and fast way to make your own clear embellishments is to simply punch it out.
 Another way to create a shape is to simply draw it and cut it out.
If you have a die cut machine, that is another option. In this example, I used my cuttlebug and just used the clear plastic in place of paper to create my butterfly. Depending on the thickness of your plastic, you may have to use your scissors to cut some of it out.
You can even emboss your clear diecut after!
Another option is to use stamps with staz-on ink (I used both white and black staz-on) and then cut the image out.


Here are all the embellishments all cut out and ready for use! I also included my layout where I used the large, clear embossed butterfly! I hope you give this a try, if you haven't already, and then load your projects in our gallery!

The following information was taken from her post at JuJuBee's Scrapbook Corner:
I just love using all the fabulous clear/acrylic products on the market but sometimes I can't find exactly what I need, so I am going to show you how I make them myself at home!
 The first step is to save the clear plastic packaging that many products are packed in. (What a great way to recycle as well:-)
  One easy and fast way to make your own clear embellishments is to simply punch it out.
  Another way to create a shape is to simply draw it and cut it out.
If you have a die cut machine, that is another option. In this example, I used my cuttlebug and just used the clear plastic in place of paper to create my butterfly. Depending on the thickness of your plastic, you may have to use your scissors to cut some of it out.

You can even emboss your clear diecut after!

Another option is to use stamps with staz-on ink (I used both white and black staz-on) and then cut the image out.


Here are all the embellishments all cut out and ready for use! I also included my layout where I used the large, clear embossed butterfly! I hope you give this a try, if you haven't already, and then load your projects in our gallery!

Subscribe to:
Posts (Atom)