Here's a quick tutorial on how to "de-stick" stamps in order to use them on your pages!
Got an Armoir or Entertainment Center that's going unused?
Can an Armoir or Entertainment Center be used to store your supplies? According to Scrapbooks, Etc., they sure can! Click HERE to see what they suggest! You can also try using an old china hutch!
Get creative and be sure to add your own touch by painting, staining or antiquing your new storage space!
Get creative and be sure to add your own touch by painting, staining or antiquing your new storage space!
Hang Up Your Supplies
 Control your punch supplies with an easy hanging system. These 1-foot metal rails from the hardware store are attached to the wall using small hooks. Slide your punchers onto the rail for a simple storage solution.
Brought to you by: Better Homes and Garden
What kind of Scrap Room do you want?
Have you thought of this? When you decide what kind of space you want to scrap in and then turn it into that, you will find how much easier and peaceful your space is to use. When you're in a happy space, you are in a happy place.
A basement room, an attic room, dining room, black and white, vintage.....you name it! Get some ideas and get to YOUR perfect scrap room! Check out THESE different scrap rooms to get you started!!
While there, check out other storage solutions suggested by Scrapbooks, Etc.
A basement room, an attic room, dining room, black and white, vintage.....you name it! Get some ideas and get to YOUR perfect scrap room! Check out THESE different scrap rooms to get you started!!
While there, check out other storage solutions suggested by Scrapbooks, Etc.
Unmounted Stamps + A Binder
 Keep unmounted stamps in one place with an inexpensive three-ring binder. Store the binder on a shelf for easy access.
Brought to you by: Better Homes and Gardens
Easy Storage for Foam Stamps
 Use black mat board and hook-and-loop tape to create a handy system for foam stamps. Cut the mat board to fit in a sturdy holder such as magazine files or document storage boxes. Then attach the hook-and-loop tape to the stamp and the board, leaving a small space between each stamp.
Brought to you by: Better Homes and Gardens
General Storage

DIMENSIONS:
from Top to Bottom: 32" high
from Front to Back: 10 1/2"
from Left to Right: 18" wide
each of the top 3 drawers: 1 3/4" deep
the bottom compartment: 15 1/2" deep
Top compartment: 3" deep
The big black piece in the front gets put in place when traveling so nothing accidentally opens and spills out. On the right side, it has a place where you can wrap your extension cord for easy transport. On the left side is where you store that same black piece when you're not traveling and are actually using it. It has two wheels on the back for easy moving.
When I flip the lid open I use the lid to hold stuff too. I get almost all my supplies off my work space with this handy little guy and I get more scrapping done too!
DIshwasher Basket Storage
Now, here's a great way to save some money and have a great place to store your stuff!
...Every scrapbooker needs to be organized, and most scrapbookers wish they could find inexpensive or free methods for storage. Why wouldn't you want to find products that were low cost or found in your own home....
Click HERE for the full story and a wonderfully inexpensive idea!
...Every scrapbooker needs to be organized, and most scrapbookers wish they could find inexpensive or free methods for storage. Why wouldn't you want to find products that were low cost or found in your own home....
Click HERE for the full story and a wonderfully inexpensive idea!
Store it in your closet!
Again, Scrapbooks, Etc. has come up with another innovative way to store your much needed supplies!
There are so many ways to store your supplies. In a roller cart, a tote, a table and so many more! Here's just one more you can give a try.
If you have a spare closet, this is perfect for you! If you don't have a spare closet, find one! This is a great way to store and organize for easy use!
Click HERE to see what you can do with an empty closet!
Inexpensive and Creative Storage
Looking for some inexpensive and creative ways to store your scrapbooking supplies? Scrapbooks, Etc. has some really great ideas! Click HERE to see what they have suggested!
Stickles
Use self-adhesive Velcro. This is, by far, the best idea I've come across. It's practical and inexpensive.
 Simply use the male side, cut it into strips and stick it straight to your wall. I know this might not work for everyone, but you could adhere it to any surface really. I just wanted mine above my desk in an easy to reach spot.
 It really makes life easier when these little guys are stored upside down :)
 Just cut little strips from the female side of the velcro and stick it on the bottles.
 And there you have it :) Super easy, I'm talking minutes, and cheap!
Also, instead of putting the velcro on your wall, you could also try adhering the velcro strip to your tote box. If you have a cloth storage tote, I'm not sure it would work. But, I have this one and it would work great! Just pick a side!
Brought to you by: Two Peas In A Bucket


Also, instead of putting the velcro on your wall, you could also try adhering the velcro strip to your tote box. If you have a cloth storage tote, I'm not sure it would work. But, I have this one and it would work great! Just pick a side!
Brought to you by: Two Peas In A Bucket
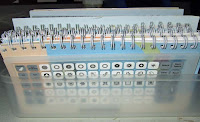
Brads and Eyelets
THIS IS MY CHOSEN METHOD:
I have chosen to use those bead containers I'm sure you've seen everywhere. However, through much trial and error, I have found the best container to use in this respect are the ones that are more like the daily/weekly pill boxes (generally found in most pharmacies). Reason being is because in the original, cheap-o version, each section is not individually closed; therefore, you will have eyelets and brads mixing into the other sections, getting them all mixed up.
 In these containers, each section has it's own lid and it is "child-proof." Meaning, there's a "trick" to openning each lid. You can't just pop it open. So, there is little to no chance that if you drop this container on the floor that it will pop open and scatter all these tiny little bits everywhere!
You can get this container (or a version of it) in any craft store. Check the cross-stitch section or sewing sections first (the price will, most likely, be less). You can also check your local pharmacy up by the pharmacy counter.
I have chosen to use those bead containers I'm sure you've seen everywhere. However, through much trial and error, I have found the best container to use in this respect are the ones that are more like the daily/weekly pill boxes (generally found in most pharmacies). Reason being is because in the original, cheap-o version, each section is not individually closed; therefore, you will have eyelets and brads mixing into the other sections, getting them all mixed up.

You can get this container (or a version of it) in any craft store. Check the cross-stitch section or sewing sections first (the price will, most likely, be less). You can also check your local pharmacy up by the pharmacy counter.
Flowers
I know most of us use Prima Flowers and tend to store them in their original packaging. Try some of these ideas to change it up.
1. Leave them in their original packaging
2. If you don't care if they're all jumbled together, a Mason jar works wonders
3. Baby food jars
4. You can also try empty spice jars on a lazy susan type thing. I've been told this whole set (jars/spinner) can be found at CVS in the seasonal gifts aisle when they put their Christmas stuff out.
MY CHOSEN METHOD:
Use ziploc baggies for optimum space saving. Place the flowers flat in the baggie and zip 90% of the way. Leave this little opening and squeeze the air out and zip it shut. (This is the method I use and I have aobut 10 different Prima Flower packages in a 6x4x2 space....and I still have room for more!!) This not only is a space saver, but it also makes it easy to tote them around for crops and such.
Buttons
1. in jars and color coordinated
2. in baggies and color coordinated
3. in a big bowl all mixed together
I HAVE CHOSEN TO USE THIS METHOD:
You can use bead storage containers of all kinds. You just have to find what best suits your purposes. The following picture is what seems to work best for me. Plus, it also keeps me from buying too many buttons!

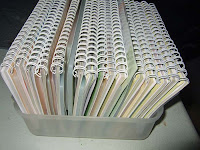
Cricut Cartridges
My favorite way to store Cricut Cartridges is to use 3-holed zipper pencil pouches. My favorite ones are the ones I can get at the Dollar Tree or Wal-Mart for $1 each and has a clear window. I insert the overlay, booklet and cartridge in each pouch.
 I bundle them up with a side opening key ring (found in most hardware stores). The key rings come in several different sizes.
With this key ring in tact, you can now hang your collection(s) of cartridges from just about anywhere.
 ALTERNATIVES to this method:
Instead of bundling them up all together and hanging them from this key ring; some have chosen to use these same pencil pouches, but store them in a 3 ring binder.

With this key ring in tact, you can now hang your collection(s) of cartridges from just about anywhere.

Instead of bundling them up all together and hanging them from this key ring; some have chosen to use these same pencil pouches, but store them in a 3 ring binder.
Ribbon
1. Stack your spools on an upright paper towel holder
2. Mount an open-ended towel rack or, for a smaller number of spools, a toilet paper holder
3. Place a tension rod in a closet or between bookshelves
4. Hang a clothesline in a corner
5. Slide a dowel through the holes of a plastic crate or basket
 6. Use a tie hanger: Just slide the ribbon through about half way, keeping the same color scheme on each hanger. Then, when you are ready to use one, just pull it out.
 7. Old fashioned clothes pins: Place one end of the ribbon in the open center and wrap ribbon around entire pin. Then, you can store each ribbon "spool" in a jar, grouping by color.
 8. Store losely in jars by color.
 9. One very unique way to store ribbon, but not very handy if you travel to crops and such.
 10. Peg-board wire rack baskets (can be found in your local hardware store in the storage department, I think. Obviously, this method can be used only if you have pegboard up on the wall.
 11. You can slide a metal, plastic or wood dowel (or tension rod) in a box.
 12. Get a large round keyring (found usually in most hardware stores)and some large safety pins. Clip the pin to one end of the ribbon and attach the safety pin to the keyring. Now, you just let it hang. With this keyring, you can hang it from just about anywhere.
 13. Bathroom door hanger
 14. An old crate or basket with holes. If you use the crate and have a pegboard set up, you can also hang the crate on some pegboard hooks.

MY CHOSEN METHOD:
Since most of my ribbon/threads/fibers don't come on a spool of any kind, I found the best way for my ribbon storage needs is in a thread storage container. This can be found in any department of a fabric shop (like JoAnn's), but the least expensive department is the cross-stitching section.

everythingetsy.com
ozinthefastlane.blogspot.com
emilygiovanni.com
whoistracy.com
sunflowerstudio.typepad.com
new-memories.com
theeverdayscrapper.com
craftystorage.blogspot.com
2. Mount an open-ended towel rack or, for a smaller number of spools, a toilet paper holder
3. Place a tension rod in a closet or between bookshelves
4. Hang a clothesline in a corner
5. Slide a dowel through the holes of a plastic crate or basket


MY CHOSEN METHOD:
Since most of my ribbon/threads/fibers don't come on a spool of any kind, I found the best way for my ribbon storage needs is in a thread storage container. This can be found in any department of a fabric shop (like JoAnn's), but the least expensive department is the cross-stitching section.

Brought to you by:
sketchbook.typepad.com
polymerclaynotes.comeverythingetsy.com
ozinthefastlane.blogspot.com
emilygiovanni.com
whoistracy.com
sunflowerstudio.typepad.com
new-memories.com
theeverdayscrapper.com
craftystorage.blogspot.com
Clip-It-Up Style Storage
From the Scrappy Go Lucky blog:
 I have been reorganizing for months within my space, trying to find a solution to my million embellishment chaos. I kept some in binders, some in drawers, and even some on hanging files. While that system did work OK, I wanted to actually have full display of all my packaged products. I considered buying a clip-it-up but.....
Be sure to click on the link above and visit her site for the rest of this story and how she created this great way to store some scrapbook embellies.

Be sure to click on the link above and visit her site for the rest of this story and how she created this great way to store some scrapbook embellies.
The Friday (.cut) Files - 3/18/11
Dream Bird is my next .cut file for you to use at your leisure!

Click HERE to download this file
If you use this file, please show me what you did with it! Post yoru creation below with a link back to you!
You only have ONE week to upload your creation here. After that, feel free to use the "2011 Layouts" tab.
Cricut Cartridge/Handbook Storage
WOW! Look at all these great ideas!!!
Found this one on Obsessed With Scrapbooking

This one was on the Cricut Message Boards!

Lucky Girl Jo had this idea!

This is the ScrapOnizer

Scrapbooking Grandma Crafts has this great solution!


This one is at Jamie Lane Designs

You have to check out Dats My Style DJ blog! Check out her scrap room!

Splat Pat using this concept

I found this on the Cricut Message Boards

This one was found at Scrappy Go Lucky

DIscount Storage
I came across this great website, Scrapbooking Warehouse, that has discount scrapbooking storage! YES! I said discount! That's MY kind of shopping experience, for sure! I don't think I have bought ANY of my scrap supplies at full price!
This place has Crop In Style, Cropper Hopper, All My Memories, EK SUccess and so many more. They have storage for papers, stickers, ribbons, brads...you name it! Go check it out! You may find just what you've been looking for!
This place has Crop In Style, Cropper Hopper, All My Memories, EK SUccess and so many more. They have storage for papers, stickers, ribbons, brads...you name it! Go check it out! You may find just what you've been looking for!
Got An Empty Closet? Fill It!!

Do you have limited space and scrapbooking supplies taking over your house?
Maybe you could turn a spare closet into something like this one. Having everything so neat and organized will make scrapbooking even more fun. Here are a few of my favorite features, and they’re all so easy to do on your own.
 Using pegboard can really make the most out a space that’s usually forgotten. Adjustable shelves make things so much easier when you want to change it around a bit later on.
 Put every inch of the closet to good use with cork trivets from a kitchen and bath store. They make a fun llittle bulletin board that’s perfect for inspiring ideas. Trivets are thick and can easily be mounted with foam tape.
 Hanging folders are a great use of space. Organizing paper by season or color can make it easy to see what you have before you run off to the store to buy more.
 Hey, this is a money saving idea here! Now you can explain to your husband how this closet will save money and he should help you do it this weekend!
Some Creative Storage Solutions
The Everday Scrapper posted a great video on YouTube on some really creative ways to store some of your scrapbooking items. Watch the video and see what you can use!
Tuesday Tutorial - March 2011
COASTER FLOWERS
Here is another tutorial for you! I hope you enjoy it!
I did another video for you where I completed my coaster flower with a few embellies! Remember, you can always add your own little touches!
I thought i'd treat you to a few additional pix too! My son, Nathan, decided he wanted to make his own coaster flower while I was making mine! Unfortunately, before I got to take a pic, he had already misplaced his project! You would have loved it! Next time, I will just take the pic immediately after we are done.
The Friday (.cut) Files - 3/4/11


CARTRIDGES USED: Blackletter
Just click on the file title to download!
If you decide to use these files, please link your creation below!
Creative Options - Storage and Organization
Check out this video on some great storage containers you can use every day and take with you to your next crop!
Click on the video title to view their Yout Tube channel.
Click on the video title to view their Yout Tube channel.
Cricut Cartridge Storage
Okay, I will admit, this isn't the BEST way to store them, BUT it will give you a great startign point. I know that's what it is for me, a starting point. I will eventually get something better, but I just had too many cartridges to continue storing them in my pencil pouches. You can get these little basket organizers at your local dollar store. They are usually 3/$1.
***tear out all the foreign language pages from the booklets. Be sure to keep an eye out on those pages that have english on the other side.
 ***put your keyboard overlays/booklets together in alphabetical order in your container. i used this little thing, but i'm sure that will change later
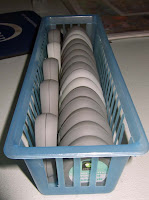 ***now put your cartridges in the same alphabetic order in another container. again, this one for me is just temporary until i find exactly what i'm looking for
That's it! Like I said, this is just a starting point for me. I plan on thinking of something a little easier to work with, but for now it will do.
I like the alphabetic order thing for sure. I may end up puting the booklets in a binder (without the spiral binding) and using tabs. That's what I really want to do. Eventually I will.
Freezer Paper + Cricut = WOW!
to use your CRICUT! OMG! You have GOT to check this out. I would NEVER have thought to do this!
Crafty Steals: We're taking you to school this Sunday!: "Good morning Crafty Stealers! We’ve decided to do something new on the Crafty Steals blog. We’re going to start making every Sunday ..."
Crafty Steals: We're taking you to school this Sunday!: "Good morning Crafty Stealers! We’ve decided to do something new on the Crafty Steals blog. We’re going to start making every Sunday ..."
Personalized Storage
This is featured over at Kaiser Crafties. . This is just such an awesome idea, I wanted to share it with you. This is created for sewing storage but, I think this could also work for desktop scrapbooking storage as well.
Give it a shot and send me your creation. I will share your completed work along with a link back to our blog and I will also forward it on to Beyond The Page. It is their creation, after all.

Be sure to check out all the other awesome stuff on their blog!!!
Dont' forget, no matter what it is that you use to store all your scrapbook supplies and papers, you can always personalize it. Use your creativity and your supplies and go for it! Let me know what you come up with! I would love to show others your wonderful ideas!
Bling
There aren't too many different ways you can store these, really, but this is what I have come up with so far.
1. ziploc baggies (the tiny ones for jewelry or the snack size ones)
2. 3-ring binder with baseball card holders (if you have lots of bling)
1. ziploc baggies (the tiny ones for jewelry or the snack size ones)
2. 3-ring binder with baseball card holders (if you have lots of bling)
My Kind Of Scrap Room
Here is a video I found at Better Homes and Gardens of an awesome basement scrap room. I wish I could have one like this. Although, it probably wouldn't stay that neat.
" So, I think this space uses a great use of creative solutions. It's all about storage, for example, so that if you're doing a craft project, you have trash easily accessible. If you wanna sew, you could bring your sewing machine out here and you can do sewing right out here, a quilt maker. If you're a crafter, if you're a scrapbook maker, you... "
Click HERE for the Video!
The Friday (.cut) Files - 2/18/11

CARTRIDGES USED: Graphically Speaking, Home Decor
Here's an elegant frame for that special picture! Download this file for your project and then link your project to your blog/site below! I would love to see what you did with it!
Cricut Booklet Storage
I finally figured out what I wanted! I love this! It's so versatile and perfect if you plan on adding to your cricut collection!
Scrapbook Paper Storage
CHEAP personalized paper storage containers? Yup! It's true and so very easy and possible!
I found this great tutorial on blnken1's You Tube channel. Click on the video title to view her channel
Easy Tub Storage
Check this out! A great new, easy, inexpensive and fun way to store so much!
Thank you Robin Stamps for this great idea!
Thank you Robin Stamps for this great idea!
Marion's Scrap/Craft Room (aka---scraft room)
For those of you interested in creating an amazing scrap room to be your creative best, here is a great video of Marion showing off her own scrap room. Be sure to visit her channel, A Piece of Craft, on You Tube! She has some fantastic tutorials and does a lot of LIVE shows too! She is one very talented lady and has a lot of inspiration to share!
This is what I envision MY ultimate scrap room to look like.......one day!
Tuesday Tutorial - February 2011
I saw this once and it really works well! You will have to use one of the hand-held Dymo Label makers
(like the old fashioned ones).
This video is a tutorial I did a while back, but it seems to have a great response! It's an Oldie but a Goodie!
Supplies needed:
original Dymo label maker
scrap strips of paper (with white core backing) about 3/8" wide
sanding block
Some of these hand held Dymos have different "wheels" which can be interchanged for different fonts and characters. Walmart and Target seem to have had the best selection and best prices. You can also go to an office supply store for a wider selection.
This is also a great way to use up some of those scraps!
Have fun and enjoy!
The Friday (.cut) Files - 2/4/11
A beautiful Dragonfly Frame for you!

Cartridges: Doodlecharms, Stretch Your Imagination
Cricut Design Studio, Tips & Tricks
One of the blogs I follow, Imagine That!, has jsut posted some fabulous information for all you Design Studio ladies!
Having trouble figuring out welding, contour, mirror image, searching the library, knowing what carts you used, and other stuff? This post will definitely answer those questions for you! Click HERE to read all the tips & tricks!
I'll be honest with you, I don't use Design Studio all that often, because I can't figure a lot of it out. Now, I can't wait to play around even more with Design Studio!
The Friday (.cut) Files - 1/21/11
Cutie Puppy
Click HERE to download this adorable file!
You will be able to use the solid puppy as a background for the outlined puppy. The flower wreath (in purple) will be laid over the solid wreath. This will give you some dimension.

CARTRIDGES: Pooh & Friends, Paper Pups, Hello Kitty Font
Tuesday Tutorial - January 2011
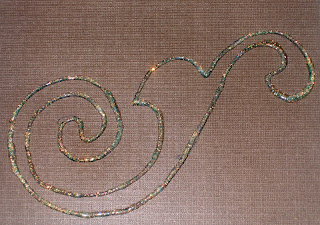
I wanted to show you how I created my "free-form" Stickle Flourish on my "So Sweet" layout. You can do this technique directly on your layout or on a separate piece of paper/cardstock. I suggest that until you are more comfortable with this technique, you try this out separate from your layout.
SUPPPLIES NEEDED:
*your template*
it does not have to be the exact same one I used. any template will do so long as you can trace
*a black pen/marker*
one that does not bleed
*stickles*
any color you choose
*your paper*
preferably cardstock as this will not buckle under the pressure of the stickles

Once you have gathered your supplies, you are ready!
Simply, lay your stencil down on your chosen paper and begin to trace

Once you are done, this is what you should see

Now, you are ready to apply your Stickles! Very carefully trace over your black line with the Stickles glue. Be careful not to lay the bottle tip directly on the paper. You want it to hover over the paper just enough to get the stickles out. This will create a ridge and give you dimension.

Once you have complete tracing your drawing this is what you will have! You may need to carefully "go over" some parts with the Stickles to even out the look. Otherwise, you can leave it as is.
Now, the next step is always the hardest! WAIT for it to dry!
Once it's dry, you have a few options. If you didn't apply this directly to your page, but on a separate piece of paper/cardstock, then you can carefully cut around it. You could also use some Liquid Glass to fill in the center. Get creative! Let me see what you do!
Subscribe to:
Posts (Atom)