Okay. So I had to play with my new heat tool.
Heat Embossing, Take 1
Okay. So, you've always wanted to try heat embossing for yourself. You thought you'd give it a try and see if your hairdryer would do the trick......um.....yeah.....NO.
Here's a video showing you WHY!
Here's a video showing you WHY!
Bleached Stamps
Here is a great video showing you how to create some unique stamped images using bleach. As always, please be careful when using bleach. Take all precautions. If needed, try this technique AWAY from your scrapping area. Should you have any mishaps, at least you won't ruin any projects.
Tag Art
Hot Off The Press posted a cool video on YouTube on tag art! This is so cool. Some really cool ideas here!
Want That Cool Crackle Look?
Well, now you can have it! Tammy Mitchell posted a great tutorial on YouTube on how to create this cool look on your own pages!
Heat Embossing
Paper Piecing for a Whole Year
Scrapbooks Etc has some easy, downloadble patterns for an entire year!
Check it out HERE!
Below are just a few samples of what you can make!

Check it out HERE!
Below are just a few samples of what you can make!

Have Fun With Blender Pens
Woo-Hoo! I've been wondering how to use these cool pens, but just now found a tutorial. I found this video on ChicknScratch's video blog!
The Original Crop-A-Dile
Wanna know how to use the original Crop-A-Dile before you go out and buy one? Well, MadScapperGirl has show us how easy it is to use this versatile tool!
The Crop-A-Dile II
If you have never heard of this great tool or aren't sure what it's all about or how to use it, this video is for you!
Thank you Scrapbook Dot Com for this great video!
Thank you Scrapbook Dot Com for this great video!
A Plethera Of Techniques
Check out this amazing video where Jennifer McGuire shows off a handful of wonderful techniques.
Thanks Jennifer for the wonderful tutorial!
Thanks Jennifer for the wonderful tutorial!
Quickutz Epic 6 with CuttleBug or Sizzlits
Wanna know how to use these together? Check out this VIDEO from scrapbook.com and learn how!
Color Matching Made Easy!
Oh my!! My friend, Jenny, from Have Your Way With Paper gave us all this incredible link!
You upload a photo, and not only does it show you a great color scheme to use with that photo, but it gives you suggestions for ACTUAL products to use for a page! AWESOME!
Click HERE to give it a try! Thanks Jenny!!!
You upload a photo, and not only does it show you a great color scheme to use with that photo, but it gives you suggestions for ACTUAL products to use for a page! AWESOME!
Click HERE to give it a try! Thanks Jenny!!!
Create a Digital Ribbon
 Scrapbook Memories has a great way to make your own 'ribbon.'
The most realistic ribbons, strings, and twine we have found are scanned or photographed elements. A scanned ribbon looks just like the real thing and gives your page a look of authenticity and without the bulk. The ribbon color can be changed by clicking on Enhance | Adjust Color | Adjust Hue/Saturation (Ctrl U) and adjusting the sliders.
If you cannot find the perfect ribbon to scan or photograph, you may need to create one digitally. To create digital Grosgrain ribbon, just follow these easy steps:
For step-by-step instructions, as well as sample pictures, click HERE.
Canvas Patches Become Flowers
 Pink Paislee has a great idea on turning canvas patches into cute and simple little flowers.
  The following is a picture tutorial Pink Paislee has supplied for their written tutorial on their website. For details on how this process works and for more ideas using this technique, be sure you visit their website!
Basic Techniques For Vellum
Vellum papers add a unique touch to any album page. From formal wedding and anniversary photos to frosty winter wonderland layouts, vellum can transform solid papers and customize patterned paper.
Because vellum is such a specialty paper, there are tricks to working with it. Vellum is not as porous as your other scrapbooking papers, so adhesives and inks won’t be absorbed as quickly. And because vellum paper is so transparent, most adhesive will show through. Once you know the tricks, you’ll find that creating wonderful vellum pages is pretty easy.
A few tips:
Handle with care. Vellum is beautiful because it is so delicate. And because it’s so delicate, it also requires special attention. As with any light–colored paper, smudges and creases show up more easily than on dark paper; vellum will be protected if stored inside the book it came in or in a file folder.
Picking Paper. When selecting paper to place under a white vellum overlay, choose the brightest patterns and colors. These will show up more clearly than a pale or very dark color. White vellum is also perfect for softening a paper pattern that’s too bright for your photo.
Pastel vellum transforms solid and patterned papers—slip a few different papers under your colored vellum sheet to discover just how many dramatic looks there are. Part of the fun of working with vellum is the delight of finding just the right combination, so play and experiment with your papers to see what you like best.
Vellum for journaling. Vellum provides a wonderful journaling option, as it allows for perfect tracing. Simply lay the sheet of vellum over the alphabet you want and trace with a pen. Because vellum isn’t as porous as regular paper, the ink often “sits” on top. Try journaling with Zig Writers, Sakura pens, Zebra’s Jimnie Gel Rollerball and Pentel Gel Rollers. Whatever you do, always let the piece dry for a few minutes before working with it.
For an extra-special effect, color with chalk, markers or colored pencils on the reverse side of a sheet of white vellum. Chalks and colored pencils will give a soft, muted look, while markers can produce a stained-glass effect.
Vellum and computer printers. Yes, you can run vellum through a computer printer. Just be sure to let the ink dry for a few minutes before handling. And if you’re printing multiple sheets, be sure to remove the vellum from the tray after printing.
Tearing vellum. Vellum can be torn for really beautiful borders. Torn vellum lends a soft look to a page. Go ahead, try it!
My favorite use. One of my favorite ways to use vellum is to mat my photos with it. I mat my photo onto a solid paper, then onto vellum—this time, I cut the border a bit larger so the vellum shows up. Then I place the matted photo onto the background paper, applying adhesive only behind the photo. It gives an extra-special look to special pages.
Brought to you by: LeNae Gerig from Scrapbooking 101
Spiral Flowers Are A Hit
 Ashley, from Have Your Way With Paper, forwarded us a link for some cool spiral flowers.
 Here are the instructions:
1.) Draw a spiral on a 4×4” piece of paper. You can vary the size of your end product by changing the size of the paper. As well, the tighter the spiral, the more layers the end product will have

2.) Cut out the spiral along the lines. I’ve seen these also made with wavy lines, by tearing the spiral out, and you could even try deco scissors for a different look.

3.) Place a glue dot on the outside end of the spiral and begin rolling from the outside. The glue dot will help the flower to not unravel.

4.) Keep rolling until the end. The last bit sometimes doesn’t want to go so I just cut it off. Let go of the flower and work the layers a bit. Put a glue dot on the end of the flower to keep it from unraveling.

5.) The finished flower!

For added texture, try ripping the paper instead of cutting and use a little inking and see what you get.
Here's the tutorial on these awesome flowers. If you attempt this technique, please share your work here and on the blog where the tutorial is shown. Thank you!
Watercoloring in Scrapbooking
One technique in scrapbooking is using watercolors. This is a technique I have yet to master, but want to try and play with it.
This tutorial was found on You Tube from 'scrapwithshelby'. It shows you how to use the Pearlescent watercolor pallette from the CK Scrapbooking Convention.
This tutorial was found on You Tube from 'scrapwithshelby'. It shows you how to use the Pearlescent watercolor pallette from the CK Scrapbooking Convention.
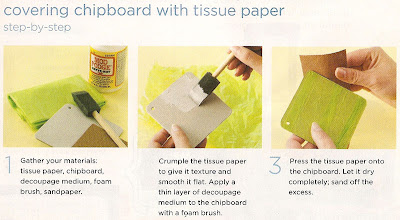
Hate Using Plain Ol' Chipboard?
Cover it! Yup, just cover it!
Now, you can cover chipboard with just about anything you can think of, so long as you use the right adhesive. But I'm going to give you some instructions I found in the July 2008 issue of Scrapbooks Etc on how to cover your chipboard with tissue paper!
Now, you can cover chipboard with just about anything you can think of, so long as you use the right adhesive. But I'm going to give you some instructions I found in the July 2008 issue of Scrapbooks Etc on how to cover your chipboard with tissue paper!

Cover That Chipboard With Thread?
Yup! That's right! There are so many different ways you can embellish your title. You don't have to just leave it plain and use it how it comes. Get creative! Think outside the box!
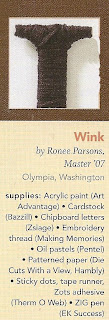
Ronee Parsons of Olympia, Washington did just that! She used embroidery thread. Check out this creative layout she made. I've also included a list of the supplies she used to make this sweet layout.
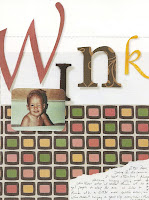
If you're not sure what that is exactly, that's the thread you would use for cross-stitching. You can find the embroidery thread in yoru local craft store in the stitching section where they have all the cross stitching things. You'll be surprised how many different colors you have to choose from.
I'll be honest, this wasn't something I would have ever thought of on my own, but I was looking through the April 2007 issue of Memory Makers magazine and I was so excited!
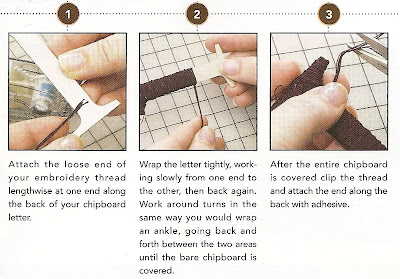
Here are the three simple steps for creating a unique title.
Ronee Parsons of Olympia, Washington did just that! She used embroidery thread. Check out this creative layout she made. I've also included a list of the supplies she used to make this sweet layout.


If you're not sure what that is exactly, that's the thread you would use for cross-stitching. You can find the embroidery thread in yoru local craft store in the stitching section where they have all the cross stitching things. You'll be surprised how many different colors you have to choose from.
I'll be honest, this wasn't something I would have ever thought of on my own, but I was looking through the April 2007 issue of Memory Makers magazine and I was so excited!
Here are the three simple steps for creating a unique title.

Have You Seen An Altered Clipboard?
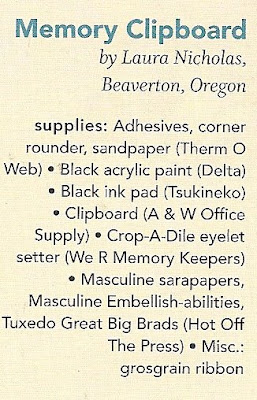
Well,if you haven't yet, you are now! Check out this amazing "memory Clipboard" by Laura Nicholas in Beaverton, Oregon. I found this in teh April 2007 issue of Memory Makers magazine. Sometimes, it can be difficult to use flowers for a male-themed layout or altered item, but Laura did a remarkable job!
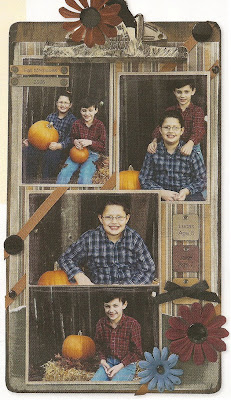
Here's a list of the supplies she used to create this great work of art.
Want the directions? Well, you got them! Remember, if you can't read the print, just click on the picture andyou should get a much bigger view.


Here's a list of the supplies she used to create this great work of art.

Want the directions? Well, you got them! Remember, if you can't read the print, just click on the picture andyou should get a much bigger view.

Wanna Distress Your Edges?
Here's one easy way to just that! In the April 2007 Memory Makers issue, Brooke Bartimioli from Hayden, Idaho created this awesome layout! She used several wonderful techniques; one of which was edge distressing.
Here is a list of the supplies she used to create this awesome work of art:

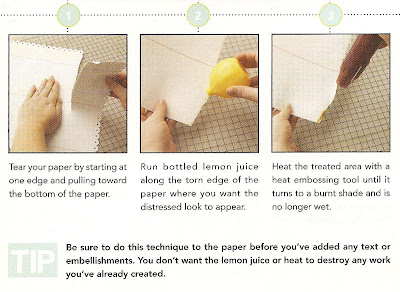
Follow these three steps to distress YOUR edges!

Here is a list of the supplies she used to create this awesome work of art:

Follow these three steps to distress YOUR edges!

Using Water Color Pencils
Using water color pencils is not easy when you're not sure what you need to do. I should know. I've messed up a stamped image or two (or more) because I had no idea what I was doing.
Well In the April 2007 issue of Scrapbooks Etc. I found this great demonstration. Now, I'm one of those people that needs to SEE how something works to understand it. So, I really hope this helps you out!
If you can't read the print on the picture very well, just click on the picture for a much larger view.
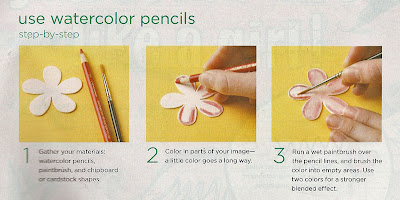

Pens & Markers 101
I found this guide to pens and markers in an old Scrapboks Etc. magazine. Check it out! It's from the April 2007 issue!
Be sure to click on the picture for a much larger and clearer view.
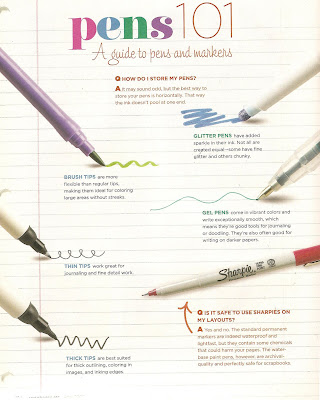
Be sure to click on the picture for a much larger and clearer view.

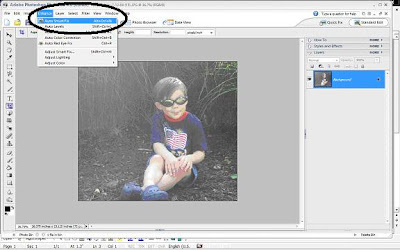
Auto Correct The Lighting In Your Picture
Clicking on the Demo Picture will enlarge it so you can see it more clearly.
Open your picture in PSE (I am using PSE 3.0)
Crop it to your liking
Click on ENHANCE
Then pick AUTO SMART FIX
If the coloring still seems a bit off:
You can click on ENHANCE
Then ADJUST LIGHTING
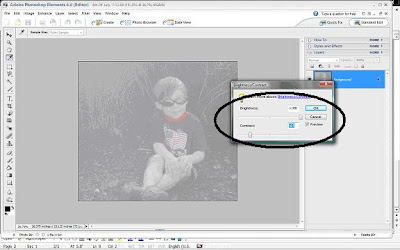
Then BRIGHTNESS/CONTRAST
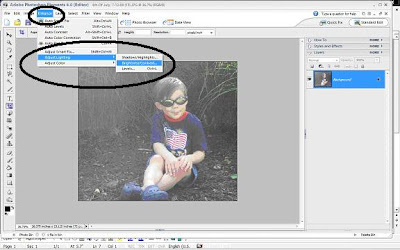
(I used brightness/contrast because I took it with too much light – you will use whatever is more fitting to our picture/preference)
Then you will slide the brightness or contrast levels around until you get the effect you want
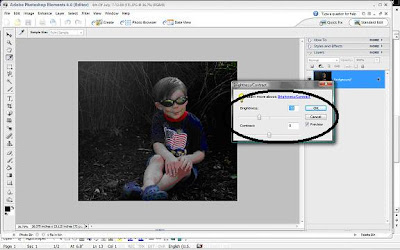
You can also use this feature to create your own background page with picture intact. Just slide the brightness and contrast to extremes
When you are satisfied with your project, don’t forget to go to FILE and SAVE AS
Open your picture in PSE (I am using PSE 3.0)
Crop it to your liking
Click on ENHANCE
Then pick AUTO SMART FIX

If the coloring still seems a bit off:
You can click on ENHANCE
Then ADJUST LIGHTING
Then BRIGHTNESS/CONTRAST

(I used brightness/contrast because I took it with too much light – you will use whatever is more fitting to our picture/preference)
Then you will slide the brightness or contrast levels around until you get the effect you want

You can also use this feature to create your own background page with picture intact. Just slide the brightness and contrast to extremes

When you are satisfied with your project, don’t forget to go to FILE and SAVE AS
Make it Yourself!
When wanting shaped papers and or Diecuts I always buy one and trace the pattern on back of the cardstock or paper that I want the shape on then cut it out.Always keep a pattern so when you can't find that certain shape in the pattern or color you want you make your own.
Also If you see a great pattern paper that has pictures you like Cut them out glitter them up and you have a instant Embellishment..
Brought to you by: Scrapbook Deals 4 U
Also If you see a great pattern paper that has pictures you like Cut them out glitter them up and you have a instant Embellishment..
Brought to you by: Scrapbook Deals 4 U
Pens & Markers
Whether you’re labeling a gift, writing a journal entry, or decorating a handcrafted card, using the best writing instrument for the job will give you creative options and polished results. Different types of ink and tip sizes are just some of the variables to consider when working with pens and markers. This guide will help you choose the ones that best suit your purpose.
Information Provided By: Michael's
Information Provided By: Michael's
100+ Ways To Use Your Sizzix
1. Use Sizzix to make fabulous titles on your school projects.
2. Make a scavenger hunt and mark the spots with Sizzix letters or shapes.
3. Label items in your house to help your children with word recognition. (This is also a great way to learn a new language for your upcoming trip to a foreign country.)
4. Make a felt board and die cut felt shapes to tell felt board stories.
5. Make a fishing game for your child's next birthday party.
6. Cut flowers with a hole in the center out of tissue and have kids make Hawaiian leis at a birthday party.
7. Cut geometric shapes and roll them up to make cool paper beads to use on any crafting project.
8. Glue a collage onto your children's furniture to make a one of a kind room.
9. Make dress up dolls for your kids (and the rest of the neighborhood too.)
10. Glue themed die cuts onto colored dowel rods and stick them in a pot or vase to use as a centerpiece.
11. Use the alphabets to make posters for your for sale or yard sale signs.
12. Sew two doll shapes together to make finger puppets.
13. Die cut Shrink Plastic and color to make earrings, necklaces, bracelets and charms. Tie these around the gift of a bottle of wine, or your cocktail glasses to differentiate who's glass is who's.
14. Die cut fabric to make personalized Christmas stockings (complete with names.), tree skirts, and ornaments to decorate your home with for the holidays.
15. Personalize your child's lunchbox or bags.
16. Make seasonal wall hangings, pillows or table runners to decorate your home or give as handmade gifts of the heart.
17. Die cut magnets from all your favorite Sizzix shapes. Fill the center holes with photos.
18. Make magnet birthday frames from any Sizzix frame, and fill it with the birthday boy or girl's photo during the month of their birthday.
19. Iron fusible bonding onto the back side of your fabric, then die cut. Iron these shapes onto your kids' pants, shorts, skirts and tops or t-shirts to make darling, custom clothing. This idea works well to personalize canvas bags and backpacks too.
20. Give the gift of Sizzix. Your friends will LOVE you.
21. Make personalized cards and gift bags for all of your gift giving. People really notice the difference.
22. Die cut your cardstock on the fold to make cute shaped cards and tags.
23. Die cut thin metals and foils. They look embossed.
24. Fold paper several times and place between the cutting blades to create accordion style cards.
25. Cut rubber and mount on wooden blocks to create your own rubber stamps. You can easily make a stamp with your family's name, or a phrase you often use for mass producing your own custom greeting cards.
26. Make themed goodie bags for birthday parties.
27. Make name tags for your next baby or bridal shower or mixer.
28. Create monogrammed stationary for yourself or your friends. They'll think of you each time they write a note.
29. Cut double sided tape, and dip into beads or glitter for a 3-D shimmery shape.
30. Make a chore chart, personalized for your child with his or her specific chores.
31. Make a calendar with your children to give to the grandparents for a special end of the year treat.
32. Die cut a shape to use as a tag tied to a gift bag with the recipient's name on it.
33. Decorate all of your letters and envelopes for the appropriate occasion or holiday.
34. Make your own Christmas cards.
35. Make your own baby announcements.
36. Make your own shower or graduation announcements.
37. Decorate your very own gratitude journal to remind you of what you're thankful for every day.
38. Make fabulous scrapbook pages.
39. Cut poly foam to create your own foam shapes. Attach these to visors, sandals and crafting projects.
40. Cut compressed sponge to make tubbie toys for your kids. Teach them their A B C's while you wash the dirt away.
41. Use Sizzix shapes to decorate your picture frames.
42. Use the circles to create tags from any material in any color. Try using metallic paper or thin metal for the outer circle. It'll look exactly like a more expensive, pre-made tag.
43. Cut shapes from white cardstock and let your kids use them to color on instead of a coloring book.
44. Use the negative shapes as photo frames.
45. Layer and rotate 2 or 3 flowers on top of each other to create 3-D flowers.
46. Make custom kitchen towels by appliquéing fabric shapes onto plain towels. Blanket stitch around each image to secure. These make super seasonal gifts, and really celebrate festivity.
47. Use the Sizzix Machine to cut thin cork for dimensional shapes.
48. Cut shapes from clear plastic (like page protectors) and back them with paper cut from the same shape. Sew them together, placing confetti or buttons inside to make your own shaped shaker cards and tags.
49. Cut a jumbo tag (folding before the bottom cutting blade), and fold bottom up and top over to make a cute little purse. Try this using Terrifically Tacky Tape to create little beaded purses.
50. Personalize school binders and book covers.
51. Organize and label your drawers and storage containers. Imagine having all of your boxes labeled in your garage.
52. Use the smaller shapes as confetti that can sprinkle out of your cards and letters.
53. Place shapes inside clear glass ornaments for your Christmas tree. Try tying a few around the top of each ornament with fibers too.
54. Make great borders for cards and scrapbook pages.
55. Decoupage on anything using all your favorite shapes.
56. Teachers, use Sizzix to make personalized welcome signs on your new student's desks.
57. Create fun door decorations to surprise anyone on a special day.
58. Have your kids make their own my room signs for their doors.
59. Make a growth ladder chart to record how fast your kids are growing.
60. Use vellum to make great fairy and dragonfly wings.
61. Use the negative shapes around letters that you cut to create fun, boxed letter titles.
62. Die cut dozens of hearts and stick them to your sweethearts car on Valentine's day.
63. Die cut seasonal greetings and make banners to hang in your window throughout each year.
64. Make a giant calendar and give it as a gift to a coworker going on holidays or retirement. Decorate each day with a different die cut symbolizing fun things to do.
65. Use die cut letters to label storage bins for easy identification.
66. Make a bouquet of die cut flowers and give them as a gift to anyone. For an especially sweet touch, die cut daisies and write she/he loves me on every petal in the bouquet.
67. Die cut your own deck of memory-match cards. Make two cards with each die cut design on them, mix them up, deal them out and see if your memory is able to match all the pairs.
68. Die cut starfish shapes out of Terrifically Tacky Tape and dip them into sand. Hide them in your child's sand box for an afternoon adventure.
69. Die cut different sizes of circles and label them all as different coin values to help your kids learn how to count money.
70. Die cut a birthday or congratulatory greeting and adhere it to a friend's windshield.
71. Cut stars from wood veneer and paint with glow in the dark paint. Adhere to the ceiling of a child's room for a night time constellation.
72. Die cut shapes out of black and adhere them to dowel rods or straws. Use them to have a shadow puppet show.
73. Die cut different themed shapes and play guess what at a party with them. Blindfold the participants and whoever guesses the most correct shapes is the winner.
74. Die cut different themed shapes and play a memory game at a party with them. Show all the participants all of the shapes for 30 seconds and then hide them again. Whoever remembers the most shapes is the winner. Try this game at a baby shower with baby themed shapes.
75. Glue two symmetrical die cut shapes to the top of a pen or pencil. Make themed pencil toppers for a party.
76. Make fake spots for your dog and dress him up as a dalmation at Halloween.
77. Cut several squares, retangles or circles to make your own little mini books. These work great to dangle over the spine of your memory book to differentiate the theme or year of the album.
78. Make shaped bookmarks with dangly tassels to give to a special friend along with a treasured book.
79. Press little reindeer tracks in the snow at Christmas time using the circle with hoof like triangles cut out of them.
80. Decorate inexpensive craft paper to make your own fabulous custom wrapping paper. Just die cut compressed sponge and dip in paint, or stencil inside the negative outer shape.
81. Try making tiny beaded books out of any shape for a miniature keepsake.
82. Cut wood veneer or fine paper to unify a room's decor. For example, die cut lots of lovely hearts from hand made paper to match a romantic decor. Hot glue these to the ends of curtain rods, or cording to be used for tie-backs, or baskets, or even to the wall as a border at the top of the wall or at chair rail height. This works for themed party décor as well.
83. Die cut shapes and titles and make plant markers for your garden. Laminate your shapes to make them extra durable. What a fun way to memorize plant names, and remember what you've planted.
84. Let your kids use die cut shapes to design their own place mat. Laminate when you are finished for a long lasting treasure.
85. Die cut confetti shapes and themed shapes and sprinkle them onto a table to add festivity to any occasion. Cut some shapes out of foil for an even more festive look.
86. Cut large Sizzix shapes from cork board and adhere to the wall in a straight line or in a design, for a cork-board strip to pin up notes or children's art work.
87. Thinly roll out Makin's No Bake Clay using a rolling pin, and let dry for a day or so. Now use Sizzix to cut all sorts of clay shapes for cards, scrapbook pages or crafting projects.
88. Die Cut your own bumper stickers.
89. Make paper dog tags for your stuffed animals.
90. Make your own wine labels for your friends.
91. Create a paper bag luminaria. Just place your paper bag around your replacement cutting mat, and die cut seasonal shapes in the top center of your paper bag. Now the light from your candle will shine out of the shaped hole. Line them up and down your walkway to celebrate the season.
92. Make paper masks for parties and plays.
93. Make kid's games such as pin the tail on the dinosaur or pin the tail on the donkey.
94. Cut out lots of small shapes to use as gift bag filler. This will really add to the theme of your gift.
95. Die cut shapes and use them outside as a pattern for side walk chalk. Your children will make masterpieces.
96. Cut lots of shapes out of vellum and overlap them on your page to make a soft, collage background.
97. Cut lots of little squares and make your own mosaic. (This also works with other small shapes.)
98. Use the negative outline template from your die cut to place over cakes, cookies, cupcakes and other desserts to use as a mask for sprinkling powdered sugar. Gently lift the template and you've got gorgeous desserts with shaped powdered sugar designs.
99. Use the alphabets to create your own word search puzzle for your kids. Use letters to make a cute background for a scrapbook page, or a fun invitation. Place vellum over the words you'd like to highlight.
100. Use shrink plastic and any large frame to shrink into tiny frames. Apply magnet material to the backs and use these as fridge magnets or gifts for family members. (Remember to decorate with color before shrinking.)
101. Use shapes and numbers to create customized clocks to coordinate with your home decor or to give as gifts.
102. Make your own paper buttons using the circle die. Hole punch the desired configuration, thread with string, and you've got flat buttons you can use on your scrapbook pages. Stack several circles on top of one another to create 3-D buttons, or emboss with clear embossing powder for a shiny button.
103. Cut the entire Paper Doll Set to use with shrink plastic to make your own tiny doll sets. (Be sure to include all the animals, accessories and toys.) You could even poke holes in them before drying to create a My friends and Me charm bracelet. What a fabulous gift for children to make and give to a friend on their birthday.
104. Cut smaller shapes from thin metals to create your own charms.
105. Accessorize the Jumbo Traditional Tag into a shirt and tie for a Father's Day card.
106. Make shoe toppers by using leather or poly foam to cut out decorations. PaddlePunch with the Lace punch for laces to go through.
107. Make your own coasters: Use cork for bottom, and foam for top (punch two and adhere together).
108. Let your kids make their own holiday placemats using Sizzix shapes. Let them color with markers or chalks. It'll keep 'em busy while you finish that fabulous dinner, and make a fun and memorable table setting as well. Be sure to laminate before using for durable treasures you can use again and again.
109. Bath fun decals: Use with poly foam to make clings for the bathtub. When wet, these will temporarily stick to the sides of the tub/walls.
110. Cutting shapes out of compressed sponge and using them as little washcloths makes bath time cleaning fun.
111. Make your own hand-made air fresheners: Use thick cardstock or tag board to cut shape out. Place in baggie with scented oil dabbed on cotton balls and let sit for 24 hours. Punch hole in top and add cute ribbon. Hang these anywhere, and use them as gifts as well.
112. Make custom hair accessories to go with any outfit by using leather, fun foam, etc. to cut shapes out of and attach to scrunchies, elastics, barrettes, etc. Try cutting the center of the flower out, and looping your ponytail through it.
113. Magnetic letters: Punch alphabet out of magnetic sheets for great refrigerator letters for school or home.
114. Candle decorations: You can use heavy tissue paper to make cutouts for candles. Decoupage on candles for beautiful decorations and centerpieces. These also make wonderful hostess gifts.
115. Create easily identifiable luggage by die-cutting your name from a Sizzix alphabet and attaching it to your suitcase with packing tape. Try using smaller letters and Sizzix Jumbo Tags to make your own custom luggage tags. Laminate for durability.
116. Teachers can use Sizzix for letter association, calendar pieces, math skills, bulletin boards, etc.
117. Die cut shapes from Terrifically Tacky Tape and attach them to a candle votive. Use microfine glitter and micro mosaic beads to cover the candle, creating a spectacular beaded centerpiece or gift.
118. Die Cut shapes out of fun foam and piece them together to make fun summer glasses or headbands.
119. Make your own special deck of cards.
120. Create custom recipe cards containing your special family recipes. Print your recipe onto your choice of die cuts, and tie onto a package of homemade cookies.
121. Create themed place cards for your next dinner, party, baby shower or bridal shower. These would be perfect for holidays, too.
122. Send look-alike paper doll thank you cards that your friends will never forget.
123. Cut out Sizzix shapes from wallpaper and apply to walls in intervals to create a lovely and unique border.
124. Use the Sizzix foot die to create a trail through the house leading to a surprise. Try using green feet leading to a pot of gold (your child's favorite cereal), or tiny pink or blue feet to lead your husband to a positive home pregnancy test.
125. Create paper appliques on cards and scrapbook pages by stuffing die cut shapes with cotton batting, then stitching around the shape with a 1/4" seam allowance to create a quilted look.
126. Use paper that is sticky on one side (sticker paper or adhesive sheets), to cut out with Sizzix. Sprinkle with embossing power and heat with an embossing gun. You'll have a shiny embossed shape.
127. Cut a sheet of the squares, hearts, or circles, then layer them starting with the largest and ending with the smallest shape. Add a foam adhesive in between for a 3-D accent.
128. Die cut a square or circle and add an Alphabitty to the middle of it. Emboss with clear embossing powder to create a shiny alphabet tile.
129. Use photos of flowers, grass or rocks to cut Sizzix flowers, grass and rocks to create interesting realistic accents on projects.
Information Provided By: Michael's
Alphabet Stickers Used Twice
When you buy a sheet of alphabet stickers, be very careful when removing them so as not to damage the area around the sticker. When the letter stickers are removed, there is a color border left over that matches the sticker used. Once you have used the most popular letters, cut the background into small squares, or various shapes, leaving the colored outline of the letter in each block. Now you have a whole new set of alphabet stickers!
Journaling on Small Vellum
Here's a nifty trick for successfully printing on smaller pieces of vellum or scraps of cardstock. Print your text onto a sheet of plain letter-size paper. Now adhere a small piece of vellum or transparency over the text with removable tape, adhering only edges that will feed into the printer first. Return the paper to the printer and print the text again. You're guaranteed to have perfectly lined up text on a small piece of vellum or transparency.
Using Your Eyelets
1. Map out your vacation route with fiber threaded through eyelets.
2. Use as laces on paper pieced-shoes.
3. Make a frame around a matted photo or journal box.
4. Tie through the hole of a tag.
5. Use in a sports scene as a basketball hoop, soccer net or fishing pole.
6. Create grass or trees.
7. Spell out a title using fibers to stitch out the letters.
8. Wrap around a border, nugget, tag or corner accent several times.
9. Make hair or other features on paper dolls.
10. Use as a string for balloon die cuts or eyelets.
11. Tie lassos for western pages.
12. Create seaweed on an ocean or vacation page.
13. Attach a tail to a kite.
14. Build a mountain/water outline.
15. Use a rope for a tug of war scene.
16. Fringe on animals.
17. Wrap fibers around letters.
18. Create a shadow for die cut letters.
19. Use fibers to tie 2 or more elements together.
20. Create bows.
21. Scarf on a paper pieced snowman.
22. Attach to a brad and use it as a yoyo.
23. Fiber piecing. See http://www.fiberscraps.com
24. Used to stitch pieces together to form a pocket.
25. As embroidery stitching.
26. Attach tire (swing) to tree.
27. Wrapping presents.
28. Crossing corners of a photo mat or journal box.
29. Clothesline for hanging mittens with wooden clothespins.
30. Stitching a template design.
31. Thread punchies on fiber and create a bracelet around a photo/mat.
32. Down the length of the page, photo mat or journal box as a border.
33. To hang/attach buttons or charms.
34. Used to hang signs or metal-rimmed tags from buttons, brad and eyelets.
35. Decorations on a Christmas tree.
36. Decorations on an Easter Egg.
37. Create a spider web.
38. Lacing 2 pieces together.
39. Ends of a hammock.
40. Wind fibers tightly to form the center of a flower or leaves.
41. To knit or crochet page accents.
42. As a blanket stitch around a border, or mat.
43. Tassels.
44. Braiding the fibers together to create borders, page breaks etc.
45. As needlepoint stitches on your page elements.
46. Hanging header letter squares or mini tags.
47. Enhancing die cuts
48. Accent on Serendipity Squares.
49. Weave through mesh.
Dress Up Your Title
I found myself doing the same thing over and over again. I found I kept putting 3 little dots on every letter. Now, I like that concept, but I realized I did it on just about every layout I was doing. So, I asked the gals on Have Your Way With Paper and here are those ideas:
1. Try leaving them be, using two (or more) different sets of thickers, using some thickers, some flat stickers/cricut cut alphas...I've inked the edges of thickers before - Lisa
2. I love mixing fonts, colors, and textures in my titles. :) It's fun to use rub-ons or something for most of the words and then pick one key word to be chipboard of foam or something that really stands out - Jenny
3. I like to tie a little ribbon around a chipboard letter on a title - Elaine
4. Use your ribbons and fibers especially around chipboard - Krissy
5. Stickles, glitter, paint, alchohol inks (only works if the letters are shiny). - Cheryl
Save A Buck or Two!
In this economy we are all trying to get the most out of what we have on hand. I love getting a kit in the mail for this reason. But sometimes the color of an embellishment is not what I am looking for. Don't be afraid to alter your embellishments so that they work with your project. It can be something simple such as a light sanding. Don't be afraid to use your markers, glitter pens, stickles, etc.
Brought to you by: Scrapbook Deals 4 U
Brought to you by: Scrapbook Deals 4 U
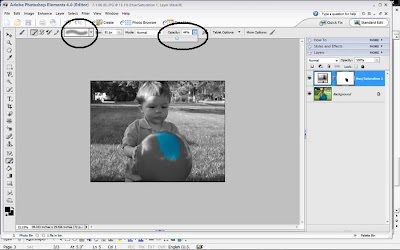
Making Pix B/W With A Little Color
Clicking on the demo photos will enlarge them in a separate window so you can see more clearly
With you picture already chosen:
Click on the black ad white circle in the layers menu and choose hue/saturation
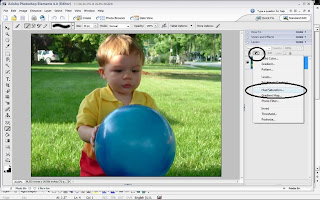
In the pop-up box, slide saturation all the way to the left. This will turn your picture black and white. Click OK.
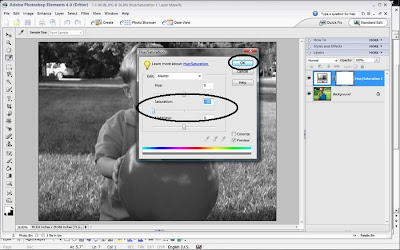
Choose the brush tool.
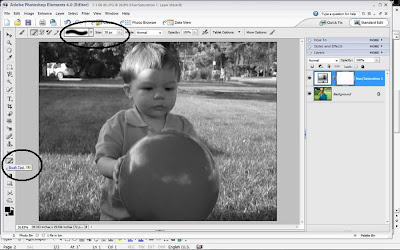
Make sure your fore ground color is black. Click OK.

While holding down the left mouse button brush over the part of your pic you want to be colorized. The color will return.

Now, if you don’t want the original color to come back quite as bright, click on the opacity button and adjust it down to your liking. Brush over the area and see the difference.
If you happen to accidentally brush over an area you don't want colorized, you can do one of two things. You can go up to edit and click on undo. Or, you make your fore ground color white and brush over that area and it will return to black and white.
When you’re done, save your pic using "save as: so you don’t save over your original picture.
Directions provided by: Scrapbook Memories
Give this technique a try and send me your completed works of art. I will be happy to show them off here. Don't forget to include a link to your blog/website!
Enjoy and have fun!!
With you picture already chosen:
Click on the black ad white circle in the layers menu and choose hue/saturation

In the pop-up box, slide saturation all the way to the left. This will turn your picture black and white. Click OK.

Choose the brush tool.

Make sure your fore ground color is black. Click OK.

While holding down the left mouse button brush over the part of your pic you want to be colorized. The color will return.

Now, if you don’t want the original color to come back quite as bright, click on the opacity button and adjust it down to your liking. Brush over the area and see the difference.

If you happen to accidentally brush over an area you don't want colorized, you can do one of two things. You can go up to edit and click on undo. Or, you make your fore ground color white and brush over that area and it will return to black and white.
When you’re done, save your pic using "save as: so you don’t save over your original picture.
Directions provided by: Scrapbook Memories
Give this technique a try and send me your completed works of art. I will be happy to show them off here. Don't forget to include a link to your blog/website!
Enjoy and have fun!!
Wild Card Sizing
One of my gal pals, Robin from Have Your Way With Paper, played around with the Cricut Wild Card cartridge. She came up with a great way to get the card to fit the envelope. Check this out!
I was playing with it last evening and I figured out a trick for sizing. Cause it is hard to just guess the sizes. you start with the envelope cut and a 12x12 paper and push fit to paper button. It will then size it automatically to the paper and a number will flash on the screen (3 3/4" for instance ). Then you know what size to make the rest of the parts of the card. They will all cut and fit to that size envelope if you set it at 3 3/4". Each shape card will ideally be a different size number.
I was playing with it last evening and I figured out a trick for sizing. Cause it is hard to just guess the sizes. you start with the envelope cut and a 12x12 paper and push fit to paper button. It will then size it automatically to the paper and a number will flash on the screen (3 3/4" for instance ). Then you know what size to make the rest of the parts of the card. They will all cut and fit to that size envelope if you set it at 3 3/4". Each shape card will ideally be a different size number.
A Child's Alphabet Book in 9 Easy Steps
Things You’ll Need:
A photo album with acid free pages (size is up to you)
Photographs
Stickers
Die cuts
ABC stickers or stencils
Adhesive
Acid free patterned or colored paper
Page protectors
Ruler
Journaling pens (ones that are safe for scrapbooking)
Dictionary
Step1:
Gather as many items as possible prior to getting started on your scrapbook photo album. Shop clearance racks and sales for stickers, die-cuts and anything else you think might work in the album. Fronts of cards often have great images that could be incorporated into the photo album. Check out several ABC books from the library and make color copies of any pictures that are unique or fun. Look through photographs of family and friends and fun activities, choosing the ones you think would work for one letter or another.
Step2:
Once you have a good stash of items you plan to use, it’s time to prepare your pages. On each page, create a border with a straight line using a ruler. On the outside of that page border, write words for that particular letter. For example, around the letter A page, you could write words such as apron, arms, amazing, accordion, adventure, add, above, Abba, album, ankle, airplane, acorn, and others, until the border was full. You can use as many or as few words as you'd like. For letters such as Q and X, repeat a series of words around the border, given that there aren’t as many from which to choose. This is where a dictionary comes in handy!
Step3:
Use large ABC stickers or a letter stencil to highlight the letter of the page. Then, it’s as simple as adding stickers, photographs, die-cuts and other embellishments to your scrapbook photo album page. For example, the letter E page might include the following: eggplant, easel, explorer, ears, elephant, earthworms, eggs, Elmo, and Ernie. If you have a family member with a name that begins with E, use photographs of that person on that page. Border words might include echo, ebb, egret, eight, egg, Eyeore, emu, and ear, to name a few.
Step4:
Some letters of the alphabet are more challenging than others. The letter O might feature Ohio, oars, an octopus, owls, and onions. For the letter U, you could use photographs of uncles, umbrellas, and the United States. For the letter X, you could use xylophone, x-ray, box, and saxophone (just underline the x in the words). The letter Q page might feature a queen, quilt, quarters, quarter notes, and a quote. Just get creative and have fun with it.
Step5:
Under each photograph, sticker, die-cut or color copy, name the item and then underline the first letter of the word to bring attention to the letter featured on the page of the photo album.
Step6:
Other ideas for photo album ABC pages might include using your state of residence, field trips, zoo animal pictures, favorite cartoon characters, photos of pets, nature pictures, or even pictures from cards you’ve received. Include a favorite poem on the P photo album page. Fill the pages as full as you like, or leave room to add other photographs and embellishments later.
Step7:
Use acid free paper to back your photographs or use stickers if you want to add more color.
Step8:
A title page in the front of the album is a nice touch. Include the date the photo album was gifted. Perhaps allow an older child to create and color the scrapbook album page for a personal touch.
Step9:
Page protectors are a must for this type of album since children love to point at the photographs and touch the pages.
Buttons, Buttons, Buttons
Buttons are not just for clothing. It's unclear when scrapbooking with buttons began as a trend. Even in early scrapbook albums, it wasn't unusual to see a button placed on a scrapbooking page. Quite often it was a keepsake button, like from a vintage piece of clothing or a baby girl's first dress. As scrapbooking pages started to become more 3-D and scrappers looked for unique embellishments for their pages, buttons became more popular. Manufacturers started offering buttons to coordinate with their paper lines, and buttons with themes like Christmas and sports became available. Monthly scrapbooking kits and page kits often include complementary buttons as part of their packages. Consider these tips for using buttons on your pages.
1. Buttons lined up together can make a border for your scrapbooking page layouts.
2. Place buttons in your titles by using them to dot your "i"s. You can also use them as the center of letters like "o" and "p."
3. Buttons can be secured to a page using embroidery floss by sewing it onto the page.
4. Glue dots work very well to adhere larger-sized buttons to a page, as well as buttons that are not flat on the bottom.
5. A few buttons make nice accents to anchor a ribbon border to a page. Again, glue dots will securely attach the buttons to the ribbon.
6. Try placing a button on the flap of an envelope to decorate a simple page element.
7. Flowers are still very popular on scrapbooking pages. Silk or paper flowers come in all sizes and colors now. A button makes a perfect center for a flower. An added benefit is that the button can hide the adhesive that typically shows through a paper flower.
8. Take 4 small buttons and attach them to the 4 corners of a photograph. The buttons will look like they are holding the photo to the page.
9. Create a bullet list for journaling. Use buttons as the bullets.
10. Scrapbooking tags can be used for page elements, photo mats, and journaling blocks on a scrapbooking page. You can use a button to decorate the hole at the top of a tag.
11. Try placing a button on a page and then hanging the string from a scrapbooking tag from it as an anchor.
12. An antique, vintage or unusual button can be used individually on a page as a page element all its own. Try double matting the button to highlight it on your layout.
13. Attach a button to a page with the holes empty, or thread some floss through the holes and tie it in a knot or bow for an added accent.
14. Don't limit yourself to one size of buttons on your page layout. Mix sizes and styles of buttons. You could stay with the same color, but have a variety of different buttons in that same color on a single page.
15. Buttons can be memorabilia. Save buttons from shirts, handbags, hats and other clothing that have sentimental value, but that you no longer can use. The buttons can be added to a scrapbooking page to remember the times when you wore those items. Baby buttons look cute on a baby page layout as well.
16. as eyes on a snowman or person
17. as buttons on a snowman or person
18. use 3 to form a triangle as accents on the corner of your page
19. use 3 to form a straight line on the side of your page
20. as flowers
information provided by http://ezinearticles.com/?15-Tips-For-Scrapbooking-With-Buttons&id=1003183
Christine Perry
Do You Love Stickles?
Instead of waiting for the book...Let's go!...
1. You can use Stickles to outline the letters in your titles.
2. You can use Stickles to outline the patterns, pictures & designs on your patterned paper s.
3. You can add a little shimmer by spreading it around with your finger!
4. You can use Stickles on handmade cards.
5. You can use Stickles to make flowers glittery.
6. You can use Stickles to make "glitzy photo corners!"
7. You can use Stickles to make firework photos glittery!
8. You can use Stickles to make the "trails" from butterflies and dragonflies.
9. You can use Stickles to doodle dots and stitches.
10. You can use the clear one which is AWESOME on stickers etc. to really make them look special. The Basic Grey cardstock stickers become 3-D and really spectacular!!
11. You can use Stickles to outline the veins in leaves.
12. You can use Stickles to add to the clothing on Bella stamps to make the girls look ready for a night on the town!
13. You can use Stickles to make brads sparkly!
14. You can use Stickles to make ribbon sparkly!
15. You can use Stickles to make icing on cupcakes and cakes shimmer.
16. You can use Stickles to make waves look 3-D.
17. You can use Stickles for making cherries/fruit shimmer as if wet.
18. You can use the color Orange to make the "fire" on the end of a birthday candle!
19. You can use Stickles to make rain drops or water drops from a watering can.
20. You can use Stickles to make fairy dust around a fairy's wand.
21. You can use Stickles to decorate your kids school supplies instead of buying designer stuff.
22. You can use Stickles to cover entire cutouts.
23. You can use Stickles over the designs on grunge board. It looks great!
24. You can use Burgundy Stickles as the perfect color to add blood droplets on your Halloween LO's.
25. To cover clear embellishments entirely and make them oh so sparkly!
26. You can use Stickles under transparencies, to adhere them. Looks great for bubbles.
27. You can use Stickles for decorating t-shirts. When they're worn down, ripped or you tired of them, cut out the design and scrap it. More mileage this way.
28. You can use dots made with Stickles to border a page!
29. You can use Stickles for slug trails.
30. You can use Stickles for snail trails.
31. You can use Stickles to decorate tennis shoes.
32. You can use Stickles to decorate buttons.
33. You can use Stickles to decorate ribbons.
34. You can use Stickles to make a spiderweb sparkle in a Halloween LO.
35. You can use Stickles on handmade tags.
36. You can use Stickles to add bling to hats or crowns.
37. You can use Stickles to make jewelry gleam!
38. You can use Stickles to make belts shine!
39. You can use Stickles to add pizazz to purses & some shine to shoes!
40. Add Stickles to all or any misc accessories! (whether it be in a LO or IRL...That's up to you! LOL!)
41. Add stickles dots to decorate lots of things, especially stamped swirls or flowers.
42. You can use Stickles generally anywhere on your LO, just to add some bling!
43. You can use Stickles to highlight just one letter in a title and make it POP!
44. You can use Stickles to make a circle or square of dots to frame closely in on a face or object in a photo.
45. You can add Stickles to the center of flowers.
46. You can run Stickles along swirly-swirls!
47. You can use a line of Stickles to make a thin (or thick!) border around anything (or everything!) on your page.
48. You can use Stickles to highlight the shadow on stamped letters.
49. You can use Stickles to stamp with them!
50. You can use Stickles to embellish concert LO's.
51. You can use Stickles to make flourishes on your flourishes and make them look embossed.
52. You can use your Stickles to add bling to a star.
53. You can add them to flames to make them shimmer, glow & come alive!
54. You can use the color Cotton Candy to enhance...Um, well, Cotton Candy!
55. You can use the Candy Cane Stickles for...Candy Canes!
56. You can use the Icicle Stickles for...Icicles...
57. You can use Waterfall Stickles for...Water & Waterfalls...
58. You can use Orange Peel Stickles for...Oranges...
59. You can use Stickles to make the lines of a shooting star!
60. You can use Stickles on flowers to make them sparkle!
61. You can use Stickles as paint (dot a little then spread with paintbrush)
62. You can use Stickles to make a proper Disco Ball!
63. You can tear paper snow for cards or layouts & run Stickles along the top edge of the snow.
64. Stock up on the white/frosty colored Stickles...Stickle the paper or the ghost shape flakes...You can also stamp snowflakes and put Stickles in the center of the snowflake.
65. You can add Stickle to anything that you stamp!
66. You can use Stickles on paper piercings.
67. You can use Stickles on diecuts.
68. When using jewels, outline the jewel with Stickles.
69. You can use Stickles to outline a journal box.
70. You can use Stickles to decorate a cast.
71. You can use Stickles to decorate gift bags.
72. You can use Stickles to decorate wrapping paper.
73. You can use Stickles on feathers for Mardi Gras or Las Vegas LOs.
74. You can use Stickles with a stencil instead of ink.
75. You can print out stuff from Google, then add Stickles and top with Diamond Glaze to make homemade sparkly stickers!
76. You can apply Stickles to the top of Thickers.
77. When glitter comes off of stickers/paper, you can fill it in with Stickles to make it back to normal!...You can use Stickles to glue more glitter on top of the sticker!
78. You can use Stickles to make the eyes on a Disney Princess cut with your Cricut.
79. You can use Stickles to create rays of sunshine!
80. You can use your Stickles to create a rainbow!
81. You can use Stickles to make a heart (or hearts) shine!
82. You can use Stickles to make stars glitter & shine!
83. You can use Stickles to make moonbeams shine!
84. You can use Stickles on diecut Christmas trees to make the bulbs sparkle & shine!
85. You can add Stickles to your own Christmas ornaments or Christmas ornaments as gifts!
86. You can use Stickles to add shine to a trophy.
87. You can use Stickles to a title block.
88. You can use Stickles to add sparkles to a Shamrock.
89. You can use Stickles to add sparkles to an Easter Egg.
90. You can use Stickles to add rays of light to a Christian cross.
91. You can use Stickles to create firework frame around something (For example, a name or an object!)
92. You can use Stickles to make fish glimmer.
93. You can use Stickles to make water reflect (ocean, lake, waterfall, ripples, streams, fountain, aquarium, etc.)
94. You can use Stickles to make a reflective mirror.
95. You can use Stickles to highlight Art Deco from the 60's, 70's, 80's or 90's found in the backgrounds of pictures.
96. You can use Stickles to highlight a monogram.
97. You can use Stickles on inchies.
98. You can use Stickles on tear bears.
99. You can use Stickles to add bling to automobiles.
100. You can use Stickles on your Disney Princess pages.
101. You can use Stickles on everything & anything & as long as you still have Stickles to use!
information provided by http://www.scrapbook.com/tips/doc/35661/147.html
(source: KellyCali & all the wonderful & creative ladies from the sb.com General Scrapbooking board!)
6 Steps to Lasting Pages
Use the Acid Scale When Scrapbooking
Things You’ll Need:
PH-detecting pen
Acid-free scrapbooking album and pages
Things You’ll Need:
PH-detecting pen
Acid-free scrapbooking album and pages
Acid-Free Paper
Archival safe adhesives, markers and chalks
Step1:
Understand the acid scale. The acid scale runs from 1 to 14. One is the most acidic, while 14 is the most alkaline. Seven is considered neutral, which means that anything with a pH of 7 or above does not contain acid.
Step2:
Shop around for the right paper. Look for papers with a pH of 7 or above. If the packaging on the paper does not give the specific pH of the paper, it should say "acid free."
Step3:
Buy a pH-detecting pen. You can buy these pens at crafts stores or from Light Impressions (see Resources below). These pens are good to use if you are not sure of the pH of the paper you have bought.
Step4:
Use your pH-detecting pen to test the paper in old scrapbooks and photo albums. If the paper tests as acidic, you should remove the photos and replace them in a new, acid-free scrapbook or album.
Step5:
Expect to pay more. Acid-free paper is more expensive than regular paper. This is largely because it has undergone a process in which the natural acids were removed. This process increases the cost of manufacturing the paper.
Step6:
Make sure the other elements of your scrapbook besides the paper are safe as well. Use acid-free adhesives, markers and chalks
information provided by http://www.ehow.com/how_2044373_use-acid-scale-scrapbooking.html
Different Ways to Display Photos
1. use your pictures (the negative space not used or cropped off) as your title lettering
2. use tags to mat you pictures and embellish with thread, eyelets, etc.
3. mat each photo letter for title and use decorative scissors around the edges
2. use tags to mat you pictures and embellish with thread, eyelets, etc.
3. mat each photo letter for title and use decorative scissors around the edges
Accent Squares
Use your scraps and a sticker maker (I choose to use the Xyron).
1. tear your scraps into pieces
2. run your scraps through your sticker maker without overlapping them (you want to make sure the adhesive covers the entire back side of your scraps)
3. stick them to some cardstock or plain paper (you can overlap here if you want)
4. cut paper into equal squares (starting with strips, then squares)
5. mat onto cardstock
6. add stickers, letters, words, brads, etc. for accent pieces or title
Photo Cropping
There are several scrapbook technique and rules to keep in mind when cropping your photos.
1. Never crop out anything that identifies the era. That car or toy in the background will make a photo more interesting in years to come.
2. Do not crop old or important photos.
3. Cropping is irreversible. Have copies done and crop those instead.
4. Scan your photo onto your computer, save it and open it in your photo program. Crop your photo there and make any corrections to that photo as well. Then, you can enlarge or shrink to preferred size and print.
5. Never crop Polaroid's as the chemicals will leech out and may cause skin and eye irritation.
One scrapbook matting technique is to crop a copy fo the photo or use a frame around the Polaroid on your page.
Is "Acid-Free" Enough?
"Isn't acid free enough?" The answer is no, acid free isn't enough and I'll explain why.
Think about all of the chemicals that you have in your home. You know, the ones that are under your kitchen sink with a baby safe lock on them. Most of them contain toxic chemicals. Would you want any of them near your photos? Acid is NOT the only material that damages photos.
Unless we are taking precautions to ensure that we are using safe materials, we might as well place our beautiful scrapbook pages in a magnetic album. Few of us would do that, but many of us do not know very much about photo preservation, what is safe, what is unsafe and WHY certain materials should be used or avoided.
Papers should be acid free, lignin free, bleach free, chemically stable. Permanent inks should be used for writing and stamping.
The Issue of Acid and Lignin:
Anything that touches your photos should be acid-free and lignin-free, including paper, glue, markers and stickers. Why? Otherwise your photos will discolor and disintegrate more quickly than they would naturally. Products that are photo-safe will be labeled as such. You can also look for the CK-OK label, which means the product has been tested by Creating Keepsakes magazine’s experts for photo-safety.
What Is Acid-Free—and Why Does It Matter?:
Acid causes paper and photos to disintegrate. This aging process is slowed significantly when acid is removed from paper during the manufacturing process. Not all scrapbooking materials are photo-safe, so be sure your paper, glue and markers are labeled acid-free or archival-quality before you purchase them. Paper Pizazz® papers are tested and guaranteed to be acid-free and lignin-free.
What’s Lignin?:
Lignin is the natural bonding element which holds wood fibers together. Newsprint contains lignin—you’ll notice how brittle and yellowed a newspaper becomes after just a few days. Like acid, lignin can be removed during processing to make scrapbooking paper safe.
If you want to include newspaper articles or announcements in your memory album, photocopy them onto acid-free, lignin-free paper. Copy onto an off-white paper that resembles newsprint for an authentic look.
information provided by:
http://articles.scrapbooking.com/TERMS.HTM
http://www.scrapbooking101.net/articles/definitionofterms.html
Stapling in the Center of Your Page
Don't have a long armed stapler, but still want to staple in the middle of your page?
Just put your page on top of your cutting mat or mouse pad. Open your stapler (like you're stapling something to the wall) and press the staple down where you want it. Then, flip your layout over and bend the prongs back.
It's simple and pain free!
Just put your page on top of your cutting mat or mouse pad. Open your stapler (like you're stapling something to the wall) and press the staple down where you want it. Then, flip your layout over and bend the prongs back.
It's simple and pain free!
Ribbons & Fibers
1. map out your vacation route with fiber threaded through eyelets
2. use as laces on paper pieced shoes
3. make a frame around a matted photo or journal box
4. tie through the hole of a tag
5. use in a sports scene as a basketball hoop, soccer net or fishing pole
6. create grass or trees
7. spell out a title using fibers to stitch out the letters
8. wrap around a border, nugget, tag or corner accent several times
9. make hair or other features on a paper doll
10. use as a string for balloon die cuts or eyelets
11. tie lassos for western pages
12. create a seaweed on an ocean or vacation page
13. attach a tail to a kite
14. build a mountain/water outline
15. use a rope for a tug of war scene
16. fringe on animals
17. wrap fibers around letters
18. create a shadow for die cut letters
19. use fibers to tie 2 or more elements together
20. weave through mesh
21. create bows
22. scarf on a paper pieced snowman
23. attach to a brad and use it as a yo-yo
24. fiber piecing (http://www.fiberscraps.com/)
25. use to stitch pieces together to form a pocket
26. as embroidery stitching
27. attach tire swing to a tree
28. wrapping presents
29. crossing corners of a photo mat or journal box
30. clothesline for hanging mittnes with wodden clothespins
31. stitching a template design
32. thread punchies on fiber and create a bracelet around a photo/mat
33. down the length of a page, photo mat or hournal box as a border
34. to hang/attach buttons or charms
35. hang signs or metal-rimmed tags from buttons, brads and eyelets
36. decorations on a Christmas Tree
37. decorations on an Easter Egg
38. create a spider web
39. lacing 2 pieces together
40. ends of a hammock
41. wind fibers tightly to form the center of a flower or leaves
42. to knit or crochet page accents
43. as a blanket stitch around a border or mat
44. tassells
45. braiding the fibers together to create borders or page breaks
46. as needlepoint stitches on your page elements
47. hanging header letter squares or mini tags
48. enhancing die cuts
49. accent on Serendipity Squares
Photo Anchors
1. attach photo anchors to the page with a brad or eyelet
2. use photo anchors as photo corners to adorn the edges of a special photograph
3. photo anchors can be used to hold multiple ribbon strands in place beautifully along a border
2. use photo anchors as photo corners to adorn the edges of a special photograph
3. photo anchors can be used to hold multiple ribbon strands in place beautifully along a border
Picture Holders
1. attach picture holders to your page with an eyelet or brad and then hang tags, photos or even letters from the triangles
2. tie ribbon or fibers to the triangles and attach the picture holder to the bottom of a photo mat as a dangling decorative embellishment
2. tie ribbon or fibers to the triangles and attach the picture holder to the bottom of a photo mat as a dangling decorative embellishment
Toggles
1. add a set of toggles to a folded card to reveal a hidden note or memorabilia
2. place each half of a toggle on opposite sides of the page, then wrap a fiber strand between them to create a border
2. place each half of a toggle on opposite sides of the page, then wrap a fiber strand between them to create a border
Hooks
1. hand mini tags from small sewing hooks that have been sewn to your page
2. place two hooks opposite eachother on the page and attach a string of wire with beads between the two hooks for a decorative border
2. place two hooks opposite eachother on the page and attach a string of wire with beads between the two hooks for a decorative border
Clasps
1. use a safety pin or hair barrette as a unique way to attach an element to your page
2. mini clothes pins or metal clips can be used to hold ribbon, journaling, tags or photos in place
2. mini clothes pins or metal clips can be used to hold ribbon, journaling, tags or photos in place
Hinges
1. attach hinges to our design with brads or eyelets
2. use small hinges that open fully to make mini photo books or to hide journaling behing a photo mat
3. attach journaling boxes or tags to the page witha series of hinges to create an interactive page with hidden surprises
2. use small hinges that open fully to make mini photo books or to hide journaling behing a photo mat
3. attach journaling boxes or tags to the page witha series of hinges to create an interactive page with hidden surprises
Buckles
1. string a ribbon (or several) through a buckle, like a belt
2. use a thick buckle as a frame and highlight a letter at the beginning of a title by placing it inside the center of the buckle
3. many buckles are just the right size to slip over a ribbon border
2. use a thick buckle as a frame and highlight a letter at the beginning of a title by placing it inside the center of the buckle
3. many buckles are just the right size to slip over a ribbon border
Layered Horizon/Landscape
Want to create your own scenic background for your page? Here is a technique by Becky Eldenburg in which she creates horizons.
After looking at the background elements in the photo, select the shades of cardstock you will be working with.
Begin working at the bottom of the page. Tear the cardstock into strips showing the white edge. Be sure to lay the largest strip down first aligning it with the edge of your page.
Continue "stacking" the torn strips so the smaller strip is on top until you have acheived the desired look.
For an added effect, you can also lightly ink the torn, white edge.
This technique can be used to create a beach, sand dunes, sunrise/sunset, forest floor, etc..... It all just depends on your cardstock selection, form of tearing and your imagination!
Dictionary Style Journaling
Here's a technique used to define the qualities of a person, emotion or event.
On the computer, type the description of your thoughts or emotions. Select a font that looks like a dictionary entry or expresses the words you want. Print our on regular paper.
Using removable tape to adhere mulberry paper over the typed page and onto the light box. The light box allows you to see the typed text through the mulberry paper. Trace over the text with the pen, transferring the hournaling onto the mulberry paper.
(NOTE: if you don't have a light box, a sunny window works great)
Tear coordinating cardstock to create your journaling block. Trim the mulberry paper to fit your block. To give a feathered edge to the mulberry, lightly wet the edges with water and tear along the wet edge.
Great Journaling Ideas About and By your Kids
Make a list of everything your child carries in his backpack, purse or stashes in a school locker. These items speak volumes about their personalities.
Have your child make a list of his likes and dislikes and include them on a page with extra snapshots. Include his handwritten list or other samples of their handwriting.
Ask your child to recount his perfect day, then design a page with his wishes in mind. Remember to use the same language he did to catch her personality.
Carry a small tape recorder or notebook. If you're carrying a recorder, make sure you have good batteries anda tape with room to spare.
Type or handwrite a transcript of a conversation between children. You and your children will love looking back to see what they thought at different ages.
If you've recorded our child's voice, incorporate them into a page with a Memory Button or by enclosing the actual tape in a small envelope (although for storing purposes and for time, this may not be the best option)
Create Personalized Tags and Journaling Blocks
Here's a great way to create your own personalized text boxes for tags or captions.
In MS Word, click on the Oval shape located on the lower taskbar. A big box will appear. Left click inside this box to show your image.
Another option:
In MS Word, click Insert at the top menu bar and select Picture then AutoShapes. There should be a dialog box on the screen (you can left click on it and drag it up to add it to your menu bar). Drag your mouse over the differnt shapes to view their name. Click a shape option and it will open a list of different shapes. Choose one. After choosing a shape, a big box will appear. Left click inside this box and your image will appear.
You can do several things with your shape now:
1. resize it (by clicking on the shape and dragging the corners and/or sides)
2. rotate it (by clicking on the shape to reveal a green button at the top which you click on and drag around)
3. fill it with color (by right clicking and choosing Format Auto Shape)
4. write in it (by right clicking and choosing Add Text)
5. change the font
6. center align, right align, left align the font
There are also Stars, Banners & Quote boxes to choose from as well.
Once finished, you can print this out onto plain white paper or for a great accent, print it out on cardstock. Your local office supply store will have several colors to choose from. I prefer white.
How to Print in a Circle
In MS Word, go to Word Art (the blue angled "A" in the Auto Shapes menu). Pick the solid, black curved one (on mine, it's top row, third from the left) then, type in what you want your title/lettering to say. Now Click on the "ABC" icon (still in Auto Shapes) and pick the shape you want (on my computer, I picked the 2nd row, 4th from the left - circle). To adjust the font sizes, play around with it. Click on your printed lettering and drag the corners of the boxes until you get what you want.
It's that simple
It's that simple
Sharpening Your Punches or Scissors
I know a lot of use use aluminum foil to sharpen our punches, but have you ever tried an empty, clean soda can?
I've seen a layout which had heart shaped charms on it punched from a Coke can. It was so cute!
By using a soda can, you sharpen your punches and scissors and have some really unique charms to use on your layouts or cards.
Cut the top and bottom off the can first. Then, cut down one side so you can flatten the soda can. Be careful when cutting!! You don't want to accidentally cut yourself on the rough edges of the can. You can then use a piercing tool or hole punch to put holes in the charms for mounting.
A New Use for Dryer Sheets
Who would've known?! Certainly, not me! How great is this? Puts new meaning to "reuse," huh?
Click HERE to find fabulous, step-by-step instructions on using an old dryer sheet for scrapbooking purposes. The tutorial is set up for a card, but surely you can get a little creative and manage to get something on your page.
You're going to be pleasantly surprised and inspired!
Click HERE to find fabulous, step-by-step instructions on using an old dryer sheet for scrapbooking purposes. The tutorial is set up for a card, but surely you can get a little creative and manage to get something on your page.
You're going to be pleasantly surprised and inspired!
Subscribe to:
Posts (Atom)